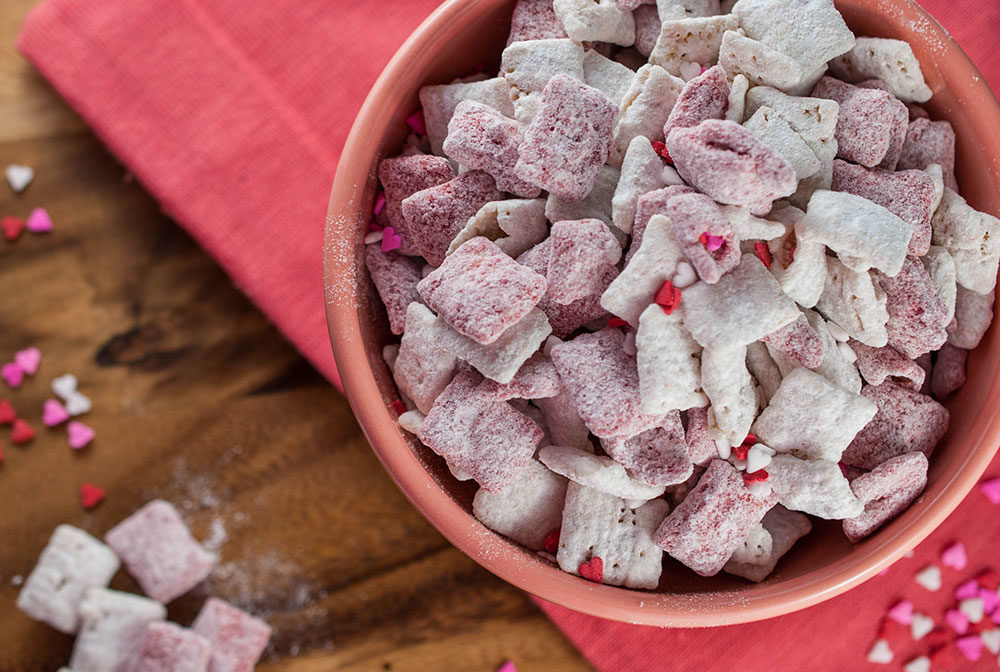
Hey there, lovely foodie friends! Alexandre here, and today I’m sharing one of my absolute favorite quick treats that’s saved many a movie night and last-minute gathering at my house. If you’ve ever found yourself craving something sweet, crunchy, and utterly satisfying but don’t have the time (or patience) for complicated baking, this chocolate-coated cereal snack is about to become your new best friend.
Picture this: crispy rice cereal squares wrapped in a velvety chocolate coating, finished with a delicate dusting of powdered sugar that melts in your mouth. It’s that perfect balance of textures and flavors that makes you close your eyes with each bite, savoring the moment. The best part? It comes together in under 30 minutes with ingredients you probably already have in your pantry.
This recipe has gotten me through chaotic weekday afternoons when the kids are bouncing off the walls, lazy Sunday evenings when I want something sweet without the fuss, and countless impromptu gatherings when I needed to whip up something impressive—fast! So grab a large bowl and let’s create some magic together.
Why You’ll Love This Chocolate-Coated Cereal Snack
When I tell you this treat is life-changing, I’m not exaggerating (well, maybe a little—but only because my enthusiasm for good food knows no bounds!). There are so many reasons to fall head over heels for this recipe:
No Oven Required: On those sweltering summer days when turning on the oven feels like a form of torture, this no-bake treat is your saving grace. Just a microwave and a mixing bowl, and you’re good to go!
Ready in a Flash: From start to finish, you’ll have a delicious snack ready in about 30 minutes. That includes cooling time, which doesn’t even count because you can be doing something else while that happens (like sneaking a few tastes from the bowl—I won’t tell).
Universally Loved: I’ve yet to meet someone who doesn’t light up when they try this chocolate-coated cereal snack. From toddlers to grandparents, it’s one of those rare treats that brings everyone to the table with smiles.
Infinitely Adaptable: Think of this recipe as your blank canvas. Whether you’re a nut lover, dried fruit enthusiast, or can’t resist a sweet-and-salty combo, you can make this snack uniquely yours with just a few twists.
Ingredients: Simple Components, Extraordinary Results
For this magical snack, you’ll need:
- 9 cups rice cereal squares: The foundation of our treat—light, crispy, and perfect for soaking up all that chocolatey goodness.
- 1 cup dark or semi-sweet chocolate chips: Choose a quality brand here; it really makes a difference in the final flavor.
- 1/2 cup almond butter or tahini: This adds a creamy richness that takes the snack to the next level. Either option works beautifully!
- 1/4 cup coconut oil: Helps create that perfect melt-in-your-mouth texture.
- 1 tsp pure vanilla extract: A touch of warmth and depth that enhances the chocolate.
- 1 1/2 cups powdered sugar: For that signature sweet coating that makes this treat so addictive.
Optional Mix-ins: Here’s where you can get creative!
- Toasted nuts (almonds, hazelnuts, cashews)
- Dried fruits (cranberries, raisins, chopped apricots)
- A pinch of sea salt (trust me on this one)
- Mini marshmallows
- Crushed pretzels for a salty crunch
Let’s Make Some Magic: Step-by-Step Instructions
Step 1: Prep Your Base
Start by grabbing your largest mixing bowl—seriously, go bigger than you think you need. Pour in your 9 cups of rice cereal squares. If you’re adding any mix-ins like toasted nuts or dried fruits, now’s the time to toss them in with the cereal.
Pro tip: For an extra flavor boost, quickly toast your nuts in a dry skillet for 2-3 minutes before adding them to the mix. The aroma alone will have your family wandering into the kitchen asking what’s cooking!
Step 2: Create the Chocolate Mixture
In a microwave-safe bowl, combine your chocolate chips, almond butter (or tahini if that’s your preference), and coconut oil. This trio is about to transform into the silkiest, most irresistible coating.
Microwave the mixture in 20-30 second intervals, stirring well after each round. I cannot stress this enough—stir between each interval! Nobody wants burnt chocolate, and this extra care ensures a smooth, velvety mixture that coats every piece of cereal perfectly.
Once everything is melted and gorgeously combined, stir in the teaspoon of vanilla extract. Take a moment to appreciate the aroma—this is what happiness smells like in my kitchen!
No microwave? No problem! Use a double boiler on the stovetop instead. Simply place your mixture in a heat-safe bowl over a pot of simmering water, stirring occasionally until melted.
Step 3: Coat That Cereal
Here comes the fun part! Pour your melted chocolate mixture over the cereal in your large bowl. Using a spatula or large spoon, gently fold the mixture until every piece of cereal is evenly coated. Take your time here—you want to be thorough without crushing the cereal.
This is where the magic happens, transforming ordinary cereal into something extraordinary. Make sure to scrape the sides of the bowl to get all that chocolate goodness incorporated.
Step 4: Add the Sweet Finishing Touch
Transfer your chocolate-coated cereal into a large resealable bag or container with a tight-fitting lid. Add the powdered sugar, seal it up tight, and then… shake, shake, shake! This is the perfect moment to call in the kids—they make excellent shakers, and it’s a job they absolutely love.
Keep shaking until every piece is beautifully dusted with powdered sugar. It should look like your cereal just took a stroll through a winter wonderland.
Prefer a lighter coating? You can also sift the powdered sugar over the cereal spread on a baking sheet instead of the shake method.
Step 5: Let It Set (The Hardest Part!)
Line a baking sheet with parchment paper and spread your coated cereal in an even layer. Break up any large clumps so each piece can set properly. Now comes the real test of willpower—let it cool and set at room temperature for 20-30 minutes.
Need it faster? Pop the tray in the refrigerator for 10-15 minutes. Just remember to let it come to room temperature before serving for the best texture.
Beyond the Basics: Tips for Chocolate-Coated Cereal Perfection
After making this treat more times than I care to admit (my family’s sweet tooth keeps me busy!), I’ve picked up some tricks that take this chocolate-coated cereal snack from delicious to absolutely mind-blowing.
Storage Secrets
First things first: how do you keep this addictive snack fresh? Store it in an airtight container at room temperature for up to a week. Though between us, I’ve never had a batch last longer than three days in my house!
If you’re planning ahead for a busy season, you can freeze portions in resealable bags for up to a month. Just thaw at room temperature for about 30 minutes before serving. The texture stays remarkably crisp, even after freezing!
Troubleshooting Tips
Chocolate seized up? No worries! Add a teaspoon of coconut oil and microwave for another 15 seconds, then stir vigorously. It should smooth right out. Crisis averted!
Cereal getting soggy? You might be working with chocolate that’s too hot. Let it cool for a minute after melting before coating the cereal. Also, work quickly but gently during the coating process.
Powdered sugar not sticking evenly? Your chocolate layer might have cooled too much. Try shaking the mixture while the chocolate is still slightly warm (but not hot enough to melt the powdered sugar).
Clumpy mess? Embrace it! Those chocolate clusters are what my kids fight over. I call them “treasure chunks” and everyone suddenly wants them. Sometimes the “mistakes” become the most beloved parts!
Creative Serving Ideas: Beyond the Bowl
Sure, you could serve this chocolate-coated cereal snack in a regular bowl (and it would disappear just as quickly), but here are some fun ways to present this treat that make it even more special:
For Gatherings & Parties
Set up a “Munch Station” with your chocolate-coated cereal snack as the star, alongside other finger foods. Use decorative paper cones, colorful cupcake liners, or small mason jars for individual servings—no sharing required, which means no arguments!
For birthdays or celebrations, package small portions in clear cellophane bags tied with colorful ribbons that match your party theme. Place them by the door as take-home treats. Trust me, you’ll be the talk of the neighborhood!
For Gifting
This snack makes an absolutely perfect homemade gift. Layer it in a mason jar, add a cute label with the recipe name (and maybe your phone number for when they inevitably call begging for the recipe), and tie it with a rustic ribbon or twine.
During the holidays, create gift baskets with this chocolate-coated cereal snack as the centerpiece, accompanied by a good book, cozy socks, or a favorite movie. It’s the kind of thoughtful gift that says, “I want you to relax and enjoy something special.”
For Family Movie Nights
Create individual “movie boxes” for each family member with a portion of this snack alongside other treats. Let everyone customize their box with their favorite mix-ins. My daughter always chooses dried cranberries, while my son goes for extra mini marshmallows.
A Personal Note: My Chocolate Cereal Awakening
I’ll never forget the first time I made this chocolate-coated cereal snack. It was a rainy Saturday afternoon, the kids were restless, and we were all craving something sweet but had zero motivation to make a grocery store run in the downpour.
Rummaging through the pantry, I found cereal, chocolate chips, and the rest of these basic ingredients. “Let’s try something,” I said, having flashbacks to a similar treat my grandmother used to make.
Thirty minutes later, we were all sitting cross-legged on the living room floor, munching away while watching old movies, our fingers delightfully dusty with powdered sugar. My son, who normally turns his nose up at anything I make that isn’t pizza or pancakes, asked if we could make it again the next day.
That moment—that simple, chocolate-coated moment of family connection—is why I love this recipe so much. It’s not just a snack; it’s an experience, a memory in the making, an impromptu celebration of the little things.
Your Questions, Answered!
Can I use a different type of cereal?
Absolutely! While rice cereal squares give you that classic crunch, I’ve experimented with corn flakes, toasted oat cereal, and even pretzel pieces. Each creates a different texture, but they’re all delicious. Just keep the measurements the same and you’re good to go.
Is there a nut-free option for this chocolate-coated cereal snack?
Yes! If you’re avoiding nuts, skip the almond butter and use sunflower seed butter or more coconut oil instead. You’ll still get that rich, creamy texture without the allergens. For mix-ins, try seeds like pumpkin or sunflower instead of nuts, or focus on dried fruits and mini marshmallows.
Can I make this recipe healthier?
While “healthy” might be stretching it (let’s be honest, this is definitely a treat!), you can make some swaps for a slightly more nutritious version. Use dark chocolate (70% or higher), reduce the powdered sugar by a third, and incorporate superfood mix-ins like goji berries, hemp seeds, or cacao nibs. I’ve also had success using a stevia-based powdered sugar alternative for the coating.
Creative Variations: One Recipe, Endless Possibilities
The beauty of this chocolate-coated cereal snack is how easily it transforms with just a few tweaks. Here are some of my favorite variations:
Seasonal Specialties
Fall Harvest: Add pumpkin spice to the chocolate mixture, then mix in dried apple pieces and cinnamon cereal pieces.
Winter Wonderland: Add crushed peppermint candies and white chocolate drizzle for a holiday twist.
Spring Celebration: Mix in pastel-colored mini marshmallows and a few drops of natural food coloring in the powdered sugar for Easter or spring parties.
Summer Camp: Add mini marshmallows, crushed graham crackers, and a hint of smoked salt for a s’mores-inspired variation that tastes like summer.
Flavor Adventures
Mocha Madness: Add a tablespoon of instant espresso powder to the chocolate mixture for a coffee-flavored treat that’s perfect for grown-up gatherings.
Tropical Twist: Use coconut cereal pieces if you can find them, and mix in dried pineapple and mango pieces. The coconut oil in the recipe already gives a hint of tropical flavor!
Savory-Sweet Balance: Add a teaspoon of sea salt and some broken pretzel pieces for that irresistible sweet-and-salty combination that keeps you coming back for “just one more handful.”
The Perfect Pairings
While this chocolate-coated cereal snack is absolutely divine on its own, here are some perfect pairings to create a more complete experience:
For coffee lovers: Serve alongside a rich, dark roast coffee. The bitter notes of the coffee beautifully complement the sweetness of the treat.
For tea enthusiasts: Pair with chai tea or Earl Grey – the spicy and aromatic qualities create a wonderful contrast.
For the kids: A cold glass of milk is the classic choice, but fruit smoothies work surprisingly well too!
For grown-up gatherings: Don’t be afraid to pair this with a dessert wine or even a chocolate stout. The combinations are unexpectedly delightful!
In Conclusion: Simple Pleasures, Lasting Memories
There’s something truly special about a recipe that brings as much joy in the making as it does in the eating. This chocolate-coated cereal snack has become more than just a treat in my household—it’s a tradition, a cure for rainy-day blues, a last-minute savior for potlucks and parties, and above all, a simple way to create moments of connection.
In our busy lives, filled with schedules and screens and constant movement, there’s profound value in pausing to make something with our hands, in gathering around a bowl of something sweet and sharing stories or laughter. This chocolate-coated cereal snack might seem simple on the surface, but like all the best recipes, its true magic lies in the moments it creates and the memories it helps build.
So the next time you’re craving something sweet, or need a quick treat for unexpected guests, or just want to see your kids’ faces light up with delight, remember this chocolate-coated cereal snack. It’s more than a recipe—it’s a little bit of happiness you can create anytime, anywhere.
I’d love to hear how your chocolate-coated cereal snack adventures turn out! Share your creative mix-ins or special occasions where this treat saved the day in the comments below. And if you’re looking for more quick, crowd-pleasing recipes, check out my 5-Minute Microwave Mug Cake or Easy No-Bake Energy Bites for more treats that deliver big flavor with minimal effort.
For more information about the nutritional benefits of dark chocolate, visit the Harvard T.H. Chan School of Public Health’s page on chocolate.
Happy snacking!
Alexandre


