There’s something magical about pulling a gorgeous dessert from the refrigerator knowing you didn’t have to wrestle with your oven or fuss over complicated techniques. That’s the beauty of this No-Bake Blueberry Cheesecake – it’s the answer to your dessert dreams on those days when you want something special without breaking a sweat. As someone who’s always juggling a million things (just like you!), I’ve perfected this recipe to be both impressive and incredibly simple.
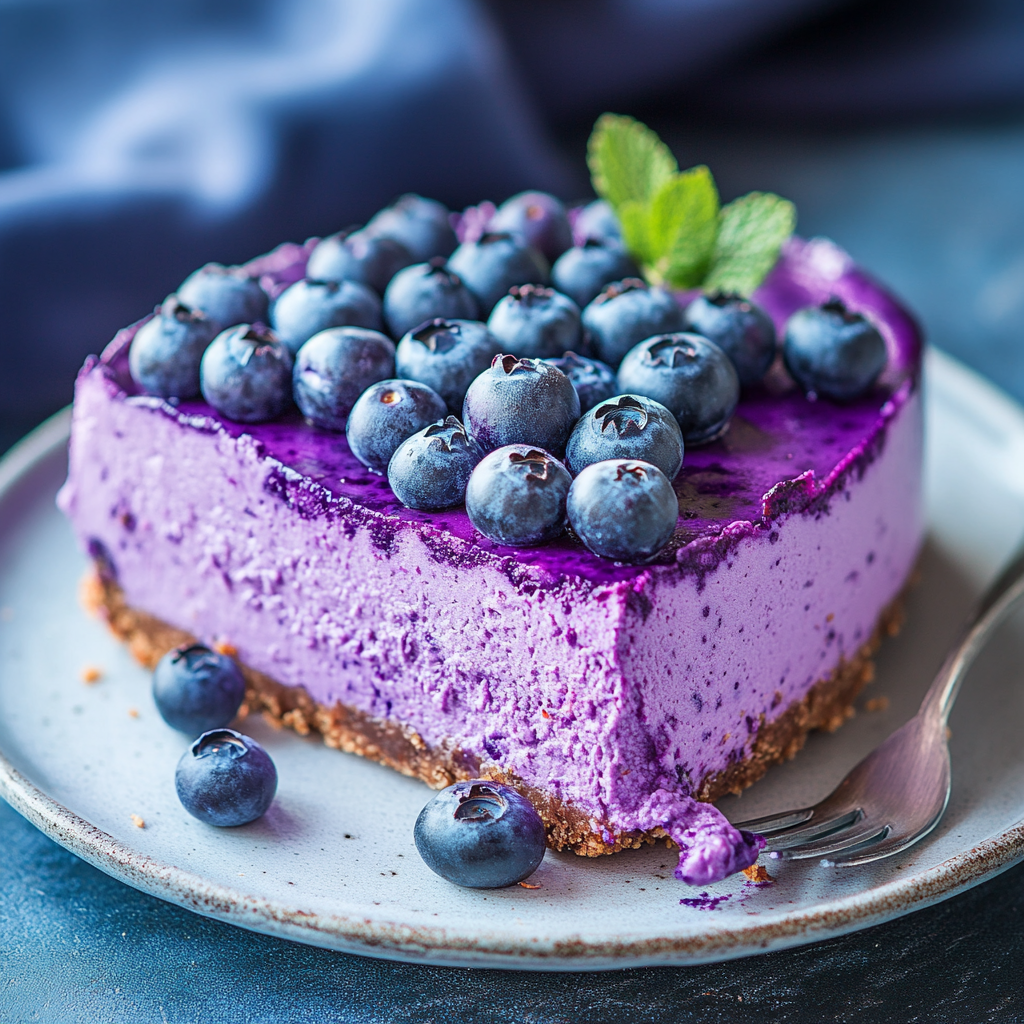
Picture this: a buttery graham cracker crust topped with a cloud-like cream cheese filling that’s perfectly sweetened and kissed with a hint of vanilla and lemon. Then comes the crown jewel – a glossy blueberry topping that adds both vibrant color and that perfect sweet-tart balance. The best part? You can make it ahead of time, meaning it’s ready whenever you are.
Why You’ll Love This No-Bake Blueberry Cheesecake
If you’re anything like me, your relationship with your kitchen changes with the seasons. When summer rolls around and temperatures climb, the last thing any of us wants is to crank up the oven. That’s where this no-bake cheesecake shines brightest!
This dessert has become my secret weapon for everything from casual Sunday dinners to last-minute guests. The texture is lighter than traditional baked cheesecakes, making it perfect for warmer weather when we all crave something a bit less heavy. The filling has this incredible melt-in-your-mouth quality that makes everyone think you spent hours perfecting it (when really, your mixer did most of the work!).
And can we talk about versatility? While blueberries create a stunning purple-blue topping that never fails to impress, you can easily swap in whatever berries look best at the market. It’s like having a dessert template that works year-round but feels especially perfect for summer gatherings.
What Makes This Cheesecake Special
There’s something about the combination of textures in this airy cheesecake that makes it irresistible. The crunchy graham cracker base provides the perfect contrast to the cloudlike filling. And that filling! It’s where the magic happens – whipped cream folded into a cream cheese mixture creates something that’s simultaneously rich and light.
The hint of lemon juice isn’t just for flavor (though it does add a lovely brightness) – it actually helps balance the sweetness and adds complexity to every bite. And unlike baked versions, this no-bake method yields a perfectly smooth texture without worrying about cracks or water baths.
I’ve served this at countless gatherings, and the reaction is always the same – wide eyes, followed by “You made this?” followed by requests for the recipe. It’s that good, friends.
Ingredients You’ll Need
For the crust:
- 1½ cups graham cracker crumbs
- ¼ cup granulated sugar
- ½ cup melted butter
For the filling:
- 16 oz (450g) cream cheese, softened
- 1 cup heavy whipping cream
- ½ cup powdered sugar, sifted
- 1 tsp pure vanilla extract
- 1 tbsp fresh lemon juice
For the blueberry topping:
- 2 cups fresh blueberries (or frozen if fresh aren’t available)
- ¼ cup granulated sugar
- 1 tbsp fresh lemon juice
- 1 tbsp cornstarch (mixed with 2 tbsp water – optional for thickening)
Let’s Make a No-Bake Blueberry Cheesecake!
Step 1: Prepare That Perfect Crust
I always think of the crust as the foundation of any good cheesecake – get this right, and you’re halfway to dessert heaven! Start by combining the graham cracker crumbs and sugar in a medium bowl. If you’re starting with whole graham crackers, a food processor makes quick work of turning them into fine crumbs, but you can also place them in a zip-top bag and crush them with a rolling pin (a great way to release any kitchen frustrations, by the way!).
Pour in the melted butter and mix until every crumb is coated. The mixture should resemble wet sand and hold together when pressed. Transfer this mixture to a 9-inch springform pan – my preferred vessel for cheesecakes because it makes serving so much easier. Use the back of a measuring cup or glass to press the crumbs firmly into the bottom of the pan, creating an even layer.
Pop this in the refrigerator for at least 30 minutes. This chilling time is non-negotiable – it’s what helps your crust hold together when you slice the finished cheesecake.
Step 2: Create the Dreamy Filling
While your crust is chilling, it’s time to work on the star of the show – that luscious, creamy cheesecake filling. Make sure your cream cheese is properly softened before you begin. Cold cream cheese will leave you with a lumpy filling, and nobody wants that! I usually leave mine out for about an hour before starting.
In a large mixing bowl, beat the cream cheese until it’s smooth and creamy – this usually takes 2-3 minutes with an electric mixer. Don’t rush this step; those extra minutes of beating incorporate air into the cream cheese, contributing to the light texture we’re after.
Add the powdered sugar, vanilla extract, and lemon juice, then continue beating until everything is well combined. Set this mixture aside for a moment while you work with the heavy cream.
In a separate bowl, whip the heavy cream until stiff peaks form. This is one of those cooking terms that confused me for years until someone explained it simply: when you lift your beater, the cream should form a peak that doesn’t flop over at the tip. It usually takes 3-4 minutes of beating on medium-high speed.
Now comes a crucial step that requires a gentle touch: fold the whipped cream into the cream cheese mixture using a spatula. The key word here is fold, not stir. Gently sweep from the bottom of the bowl to the top in a folding motion. This preserves all that air you’ve incorporated, which is what makes this airy cheesecake live up to its name. Mix just until combined – overmixing will deflate your filling.
Step 3: Assemble Your Masterpiece
Retrieve your chilled crust from the refrigerator. Spoon the cheesecake filling over it, spreading it evenly with a spatula. Take a moment to smooth the top with long, gentle strokes – this extra attention to detail gives your finished cheesecake that professional look.
Cover the cheesecake with plastic wrap or a lid if your springform pan comes with one. Now, the hardest part – waiting! Refrigerate for at least 4 hours, though overnight is even better. This resting time allows the filling to set completely and the flavors to meld together.
Step 4: Prepare the Blueberry Topping
About an hour before you plan to serve your no-bake cheesecake, it’s time to make the blueberry topping. Combine the blueberries, granulated sugar, and lemon juice in a small saucepan over medium heat. Stir occasionally as the berries begin to soften and release their juices – this takes about 5-7 minutes.
If you prefer a more sauce-like consistency (which I usually do), mix the cornstarch with 2 tablespoons of water to create a slurry, then add this to the blueberry mixture. Cook for an additional 2 minutes, stirring constantly, until the sauce thickens. Remove from heat and let it cool to room temperature before adding it to your cheesecake.
The cooling time is important – if you add hot topping to your perfectly set cheesecake, you run the risk of melting all your hard work!
Step 5: The Finishing Touch
Once your blueberry topping has cooled, pour it evenly over your set cheesecake. If you’re serving immediately, you can cover the entire surface. If you’re preparing ahead, another option is to serve the topping on the side, allowing each person to add their desired amount.
Pro Tips for Cheesecake Success
After making this no-bake blueberry cheesecake countless times (my family would revolt if I stopped!), I’ve picked up some tricks that make the process even smoother:
Room temperature cream cheese is non-negotiable. I cannot stress this enough! Cold cream cheese will give you a lumpy filling that no amount of mixing can fix. Forgot to take it out of the fridge? Cut it into cubes and let it sit for 20-30 minutes to speed up the process. If you’re really in a pinch, 10 seconds in the microwave can help, but be careful not to melt it.
The folding technique matters. When combining the whipped cream with your cream cheese mixture, use a large spatula and a gentle hand. Think of it as tucking the ingredients together rather than stirring. This preserves all those lovely air bubbles that make your cheesecake light and fluffy.
Use a springform pan if you have one. While any pie dish will work in a pinch, a springform pan makes serving so much easier. No more trying to pry out that first slice intact! Don’t have one? Line your pan with parchment paper with some overhang to help lift the cheesecake out when it’s set.
Chill the serving plates. For an extra-special touch, put your serving plates in the refrigerator for 15 minutes before slicing and serving. This helps keep the cheesecake perfectly chilled all the way to the table.
The secret to clean slices? Dip your knife in hot water and wipe it clean between each cut. This prevents the filling from sticking to the knife and gives you picture-perfect slices every time.
When Blueberry Cheesecake Saved Dinner
I’ll never forget the time my mother-in-law announced an impromptu visit just hours before she was due to arrive. My kitchen was a disaster, I had no dinner plan, and my stress levels were through the roof. In a moment of inspiration (or desperation), I whipped up this no-bake cheesecake while simultaneously ordering takeout from our favorite local restaurant.
When dinner was over, I proudly brought out this beautiful purple-blue masterpiece, and you would have thought I’d spent all day in the kitchen! My mother-in-law was so impressed she asked for the recipe, which I graciously shared while conveniently leaving out just how simple it was to make.
The beauty of this make-ahead dessert is that it’s always ready to save the day. It’s become my secret weapon for those “Oh no!” moments when I need something impressive with minimal effort. And honestly? Nobody needs to know how easy it was unless you choose to tell them.
Frequently Asked Questions
Can I make this cheesecake without a springform pan?
Absolutely! While a springform pan makes serving easier, a regular pie dish works too. To make removal easier, line the dish with parchment paper with some overhang on the sides to use as handles. Alternatively, you can make individual servings in small glasses or jars for a fun presentation – no slicing required!
My filling isn’t firm enough. What went wrong?
The most common culprit is not whipping the cream to stiff enough peaks. The whipped cream provides the structure that helps this airy cheesecake set properly. Make sure you’re whipping until the cream forms peaks that stand up straight when you lift the beater. Another possibility is that it simply needs more time in the refrigerator – some refrigerators run a bit warmer than others, so give it an extra few hours or even overnight.
Can I use frozen blueberries for the topping?
Yes! Frozen blueberries work beautifully for the topping and can actually be easier to work with since they break down more readily when heated. No need to thaw them first – just add them directly to the saucepan with the sugar and lemon juice. You might find you need a touch less cornstarch as frozen berries tend to release more liquid.
Making This Recipe Your Own
Part of the joy of cooking is putting your own spin on recipes, and this no-bake cheesecake is wonderfully adaptable:
Change up the fruit: While blueberries create a stunning topping, this recipe works beautifully with strawberries, raspberries, or a mixed berry combination. In fall, try sautéed apples with cinnamon for a seasonal twist.
Play with the crust: Graham crackers are classic, but chocolate cookie crumbs, gingersnaps, or even crushed pretzels for a sweet-salty combination work wonderfully too.
Add some texture: Fold some white chocolate chips or small pieces of fruit into the filling for surprise pockets of flavor and texture.
Go boozy: For an adults-only version, add a tablespoon of orange liqueur or berry schnapps to the filling or the topping for an extra layer of flavor.
Perfect Pairings: What to Serve with Your Cheesecake
This creamy cheesecake is delightful on its own, but if you’re looking to create a complete dessert experience, consider these accompaniments:
A dollop of lightly sweetened whipped cream adds another layer of indulgence.
For a contrast in temperatures, a small scoop of vanilla ice cream alongside each slice is heavenly.
Coffee is a natural partner – the slight bitterness balances the sweetness of the cheesecake perfectly. I particularly love serving this with a rich, dark roast.
For special occasions, a glass of dessert wine like Moscato d’Asti or a late-harvest Riesling complements the berry flavors beautifully.
Why This Has Become Our Family Favorite
Over the years, this no-bake blueberry cheesecake has become more than just a dessert in our home – it’s a tradition. It’s what my children request for birthdays, what I bring to family gatherings, and what friends have come to expect when they join us for dinner.
There’s something special about having a recipe that’s both foolproof and impressive. It allows you to focus on what really matters – the people around your table – rather than stressing in the kitchen. And isn’t that what good food is really about? Creating moments and memories while nourishing those we love.
The joy on people’s faces when they take that first bite of this perfectly balanced dessert makes any effort worthwhile. It’s rich without being heavy, sweet without being cloying, and impressive without being complicated – truly the perfect dessert trifecta.
The Perfect Summer Dessert That Travels Well
Another reason to love this summer dessert is its portability. Unlike many desserts that wilt, melt, or get soggy when transported, this cheesecake holds up beautifully for picnics, potlucks, or backyard gatherings.
For easy transport, I keep the cheesecake in the springform pan until I reach my destination. The sturdy graham cracker crust and well-set filling mean you don’t have to worry about it sliding around or losing its shape. I often bring the blueberry topping in a separate container and add it just before serving – this not only makes transport easier but also creates a little “ta-da” moment when you add that final, beautiful layer in front of your audience.
Connecting With Other Food Lovers
If you enjoy this recipe, you might also love my Lemon Raspberry Trifle, which has a similar light and fruity profile perfect for warm weather. For another no-bake option, my Classic Tiramisu is always a crowd-pleaser.
For more information about different types of cheesecakes and their histories, the Cheesecake section on Serious Eats offers fascinating insights and additional techniques.
A Final Slice of Advice
As we wrap up this culinary journey, remember that the best thing about this no-bake blueberry cheesecake is its forgiving nature. It doesn’t demand perfection or professional skills – just a little time and love. Even if your crust isn’t perfectly even or your topping isn’t precisely spread, the result will still be delicious.
Cooking should bring joy, not stress, and this recipe embodies that philosophy perfectly. It’s designed to make you feel successful in the kitchen and proud of what you’ve created. So embrace the process, make it your own, and enjoy not just the dessert itself but the smiles and satisfaction it brings to your table.
The next time you’re craving something sweet, or need a reliable dessert for any occasion, I hope you’ll remember this recipe. It’s more than just ingredients and instructions – it’s an invitation to create something beautiful that brings people together. And in my book, that’s what great food is all about.
Happy cooking, friends! I’d love to hear how your cheesecake turns out and what variations you try. The kitchen is a place for creativity and joy – embrace both with this delightful dessert.


