Hey there, wonderful bakers! Alexandre here from foodytasty.com. Today, I’m sharing one of my absolute favorite recipes that has the power to transform any ordinary dessert into something truly extraordinary – my Ultimate Chocolate Buttercream Frosting.
Picture this: a velvety, rich, cloud-like frosting that melts in your mouth, delivering the perfect balance of chocolate intensity and creamy sweetness. The kind that makes everyone at the table ask, “What’s in this frosting?” while they’re already going for seconds. That’s what we’re making today!
Why You’ll Love This Chocolate Buttercream Frosting
Life gets busy, I know. Between juggling work deadlines, family responsibilities, and trying to maintain some semblance of a social life, spending hours in the kitchen isn’t always feasible. That’s why this chocolate buttercream frosting is such a game-changer – it’s quick to whip up (pun absolutely intended), yet tastes like you spent all day perfecting it.
This isn’t just any frosting. It’s that reliable friend who shows up looking fabulous without much effort. Whether you’re decorating a birthday cake for your little one, jazzing up some cupcakes for a potluck, or just want to turn your weekend baking into something special, this frosting has your back.
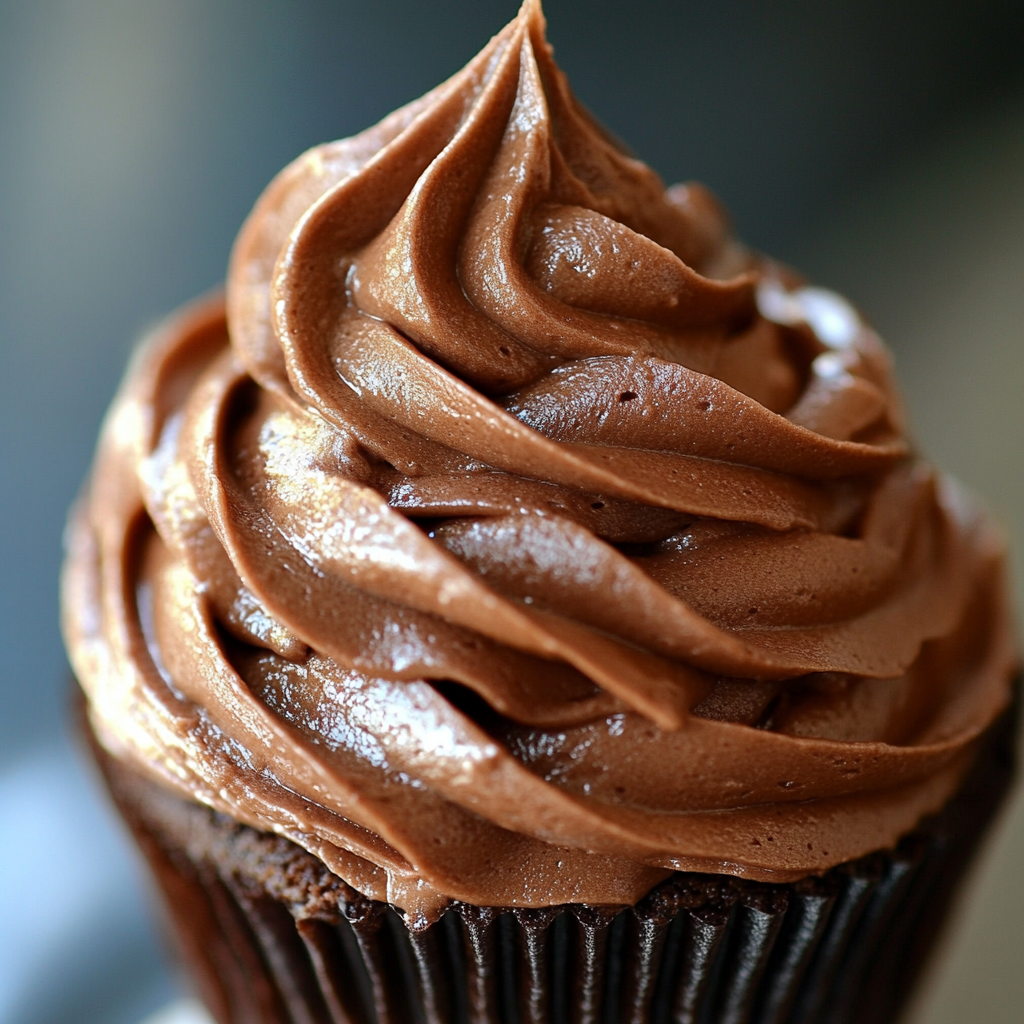
What makes this American Chocolate Buttercream Frosting stand out is how versatile it is. It pipes beautifully for those Instagram-worthy swirls, spreads smoothly for a more rustic look, and holds its shape even on warmer days (we’ve all had those dessert disasters where everything starts melting before guests arrive, right?).
The Magic Behind Perfect Chocolate Buttercream
Before we dive into the how-to, let’s talk about what makes this frosting so special. The secret lies in the balance and quality of ingredients. We’re not reinventing the wheel here – we’re just making sure it rolls perfectly smooth!
The butter provides that rich, creamy base that’s characteristic of American buttercream. The cocoa powder brings deep chocolate flavor without making things too heavy. A touch of salt (don’t skip this!) enhances the chocolate notes while balancing the sweetness. And just a splash of vanilla rounds everything out with a warm, familiar undertone.
This is the kind of recipe that made me fall in love with baking – simple ingredients coming together to create something that feels like magic on your taste buds.
Ingredients You’ll Need
Let’s gather everything before we start (I’m a big fan of mise en place – it makes the whole process more enjoyable and less chaotic):
- 1 cup (230g) unsalted butter, softened – Make sure it’s at room temperature! Cold butter will give you lumps, and we’re aiming for silky smooth here.
- 3 cups (360g) powdered sugar – Also called confectioners’ sugar. This gives our frosting structure and sweetness.
- ½ cup (50g) unsweetened cocoa powder – The star of the show! Dutch-processed works beautifully, but regular cocoa powder is perfectly fine too.
- 1 teaspoon (5ml) vanilla extract – Pure, not imitation, if possible.
- 2-4 tablespoons (30-60ml) heavy cream – This is what gives our frosting that luxurious mouthfeel.
- ¼ teaspoon (1.5g) salt – The unsung hero that makes chocolate taste more chocolatey!
How to Make the Best Chocolate Buttercream Frosting
Ready to create some frosting magic? Let’s break this down into simple steps:
Step 1: Prepare Your Workspace
First things first – gather all your ingredients and equipment. You’ll need a large mixing bowl, an electric mixer (stand or hand), measuring cups and spoons, and a rubber spatula for scraping down the sides of your bowl.
Pro tip: Having everything ready before you start makes the process so much more enjoyable. Plus, it reduces the chance of forgetting something important while you’re in the middle of mixing!
Step 2: The Butter Base
Place your softened butter in the mixing bowl. Remember, we want room temperature butter – it should yield slightly when pressed but still hold its shape. If you forgot to take it out ahead of time (we’ve all been there!), cut it into small cubes to speed up the softening process, but avoid microwaving it as this can cause uneven melting.
Beat the butter on medium speed for about 2-3 minutes until it becomes noticeably lighter in both color and texture. Don’t rush this step – properly creamed butter is the foundation of a light, fluffy frosting.
Step 3: Add the Dry Ingredients
Now comes a slightly messier part (I always end up with a dusting of cocoa powder somewhere on my face!). To keep things neat, I recommend sifting your cocoa powder and powdered sugar together before adding them to the butter. This extra step helps eliminate lumps and ensures a silky-smooth final texture.
Add these dry ingredients gradually, about half a cup at a time, mixing on low speed initially to prevent that dreaded sugar cloud from forming. Once everything is incorporated, increase to medium speed and beat for another 2-3 minutes.
Step 4: Flavor and Consistency
Here’s where we transform our mixture from good to amazing. Add the vanilla extract and start with 2 tablespoons of the heavy cream. Beat on medium speed until the frosting starts to come together. Then take a look at the consistency.
What we’re aiming for is frosting that’s sturdy enough to hold its shape when piped, but soft enough to spread easily without tearing your cake. If it seems too thick, add the remaining cream, one tablespoon at a time, until you reach your desired consistency.
Step 5: The Final Touch
Add your salt (seriously, don’t skip this!) and beat the mixture on high speed for 2-3 minutes. This final whipping incorporates air into your frosting, making it light, fluffy, and perfectly pipeable.
At this point, you might be tempted to dip a finger in for a taste test – and I fully encourage it! This is your chance to make any final adjustments. Need it a bit sweeter? Add a touch more powdered sugar. Want a deeper chocolate flavor? A little more cocoa powder will do the trick.
Tips for Chocolate Buttercream Success
Now that you’ve mastered the basic recipe, let me share some of my favorite tips that will help you achieve buttercream perfection every single time:
Temperature Matters
If there’s one thing I’ve learned from my years in the kitchen, it’s that temperature can make or break your frosting. Butter that’s too cold will leave you with a lumpy mess, while butter that’s too warm will give you a runny frosting that slides right off your cake.
The perfect butter should be soft enough to leave a slight indentation when pressed with your finger, but not so soft that it’s shiny or melting. If your kitchen is particularly warm (hello, summer baking!), you might need to refrigerate your frosting for 10-15 minutes if it becomes too soft during mixing.
The Sifting Secret
I know it seems like an extra step that you might be tempted to skip, but trust me – sifting your dry ingredients makes a world of difference. No one wants to bite into a lump of cocoa powder or powdered sugar! Plus, sifting helps introduce air into the dry ingredients, contributing to that cloud-like texture we’re after.
Don’t have a sifter? No problem! A fine-mesh strainer works just as well. Simply hold it over your mixing bowl and gently tap the side as you pour your dry ingredients through.
Frosting Consistency 911
Got frosting troubles? Here’s your quick fix guide:
- Too thick? Add a splash more heavy cream, one teaspoon at a time.
- Too thin? Beat in a little more powdered sugar.
- Looks curdled? Your butter was probably too cold. Keep beating, and it should come together (if not, let it warm up a bit at room temperature).
- Accidentally added too much liquid? No need to panic! Just add more powdered sugar to balance it out.
Remember, frosting is forgiving – there’s almost always a way to salvage it!
Storage Smarts
Made too much frosting? (Is there really such a thing?) You can store this chocolate buttercream in an airtight container in the refrigerator for up to a week or in the freezer for up to three months.
Just remember to bring it back to room temperature and give it a quick re-whip before using it. This refreshes the texture and makes it spreadable again.
My Chocolate Buttercream Story
I’ll never forget the first time I made this frosting for my nephew’s dinosaur-themed birthday party. I had promised him a chocolate cake with “mountains of chocolate frosting” (his exact words), and I was determined to deliver.
The night before the party, I doubled this recipe and went to town decorating a chocolate layer cake with “volcanic peaks” of frosting. I even added some red and orange food coloring to a small portion to create “lava flows” down the sides.
When it came time to sing Happy Birthday, his little face lit up like I’d just given him the moon. “It’s EXACTLY like I imagined, Uncle Alex!” he exclaimed. And you know what? In that moment, I remembered why I love baking so much. It’s not just about creating something delicious – it’s about creating memories and moments of joy.
That cake was devoured in record time, with several of the parents asking for the frosting recipe. One mom even admitted to sneaking a second piece just for the frosting! Now that’s what I call a baking win.
Your Chocolate Buttercream Frosting Questions Answered
Can I make this frosting without heavy cream?
Absolutely! While heavy cream gives this frosting an extra luxurious texture, you can substitute it with whole milk, half-and-half, or even a non-dairy alternative like almond or coconut milk. Just keep in mind that different liquids will slightly affect the final flavor and texture, so you might need to adjust the amount.
How much frosting does this recipe make?
This chocolate buttercream recipe makes enough to generously frost 12-15 cupcakes with piped swirls, or to frost and fill an 8-inch two-layer cake. If you’re just doing a thin coating, it could stretch to a 9-inch three-layer cake. When in doubt, I always recommend making a bit extra – leftover frosting freezes beautifully, and it’s better than coming up short in the middle of decorating!
Can I make this frosting ahead of time?
Yes, and I often do! This homemade frosting can be made up to three days in advance and stored in an airtight container in the refrigerator. When you’re ready to use it, let it come to room temperature (this takes about 30-45 minutes), then re-whip it for a minute or two until it becomes fluffy again. It’s a great time-saver when you’re preparing for a special event or holiday baking.
Creative Ways to Use Your Chocolate Buttercream
While this frosting is perfect on cakes and cupcakes, don’t limit yourself! Here are some of my favorite alternative uses:
- Cookie Sandwiches: Spread between two chocolate chip cookies, shortbread, or even chocolate wafers for an indulgent treat.
- Brownie Topping: Transform simple brownies into a decadent dessert with a layer of this frosting.
- Fruit Dip: Serve with strawberries, banana slices, or apple wedges for a fun dessert fondue.
- Graham Cracker Stacks: Layer between graham crackers and refrigerate for a few hours for an easy, no-bake treat that kids love.
- Hot Chocolate Booster: Add a dollop to your hot chocolate for an extra rich experience.
Variations to Try
The beauty of this base recipe is how easily it can be customized. Here are some delicious variations:
Mocha Buttercream
Add 1-2 teaspoons of instant espresso powder dissolved in a tablespoon of hot water. The coffee enhances the chocolate flavor without making it taste like coffee.
Orange Chocolate Buttercream
Add 1 teaspoon of orange zest and a few drops of orange extract for a chocolate-orange combination that’s absolutely divine.
Mint Chocolate Buttercream
Replace half the vanilla extract with peppermint extract for a refreshing twist that pairs beautifully with chocolate cake.
The Perfect Pairings
Wondering what cakes go best with this chocolate buttercream frosting? Here are my top recommendations:
- Classic Vanilla Cake – The contrast between the vanilla cake and chocolate frosting is timeless for good reason.
- Yellow Butter Cake – The rich buttery flavor complements the chocolate beautifully.
- Devil’s Food Cake – For the ultimate chocolate experience!
For more inspiration, check out this collection of 25 Easy Cake Recipes from AllRecipes that would pair wonderfully with this frosting.
A Final Note on Chocolate Buttercream Frosting
There’s something magical about sharing a dessert topped with homemade frosting. It’s more than just sugar and butter – it’s a little piece of your heart on a plate. This chocolate buttercream frosting recipe has been my go-to for years, bringing smiles to countless family gatherings, celebrations, and yes, even a few “just because” moments.
Remember, baking isn’t about perfection – it’s about creating something with love. So if your frosting swirls aren’t bakery-perfect or if you get a few crumbs in the frosting (we call those “rustic charm” in my kitchen!), it doesn’t matter. What matters is the joy it brings to both the baker and those lucky enough to take a bite.
The next time you need a reliable, delicious chocolate frosting that will have everyone asking for your secret, give this recipe a try. It might just become your new signature dessert topping!
And if you do make it, I’d love to hear how it turned out. Did you stick with the classic version, or did you try one of the variations? What did you pair it with? The best part of sharing recipes is hearing how they become part of your kitchen stories too.
Happy baking, friends! Until next time, remember that a little chocolate buttercream frosting makes everything better.


