Picture this: it’s Sunday morning, the sun is streaming through your kitchen window, and instead of regular flat pancakes, you’re about to create a stack of cloud-like, jiggly Japanese pancakes that will make everyone at your table gasp with delight. These aren’t your everyday pancakes, friends. These fluffy Japanese pancakes are a breakfast game-changer that transforms ordinary mornings into something truly special.
Why You’ll Love These Fluffy Japanese-Style Soufflé Pancakes
Let’s be honest—mornings can be chaos, especially if you’ve got kids scrambling for breakfast or a busy day ahead. As a mom juggling a food blog and family life, I completely understand the morning rush. But here’s the thing about these heavenly japanese pancakes: they’re worth every extra minute of preparation.
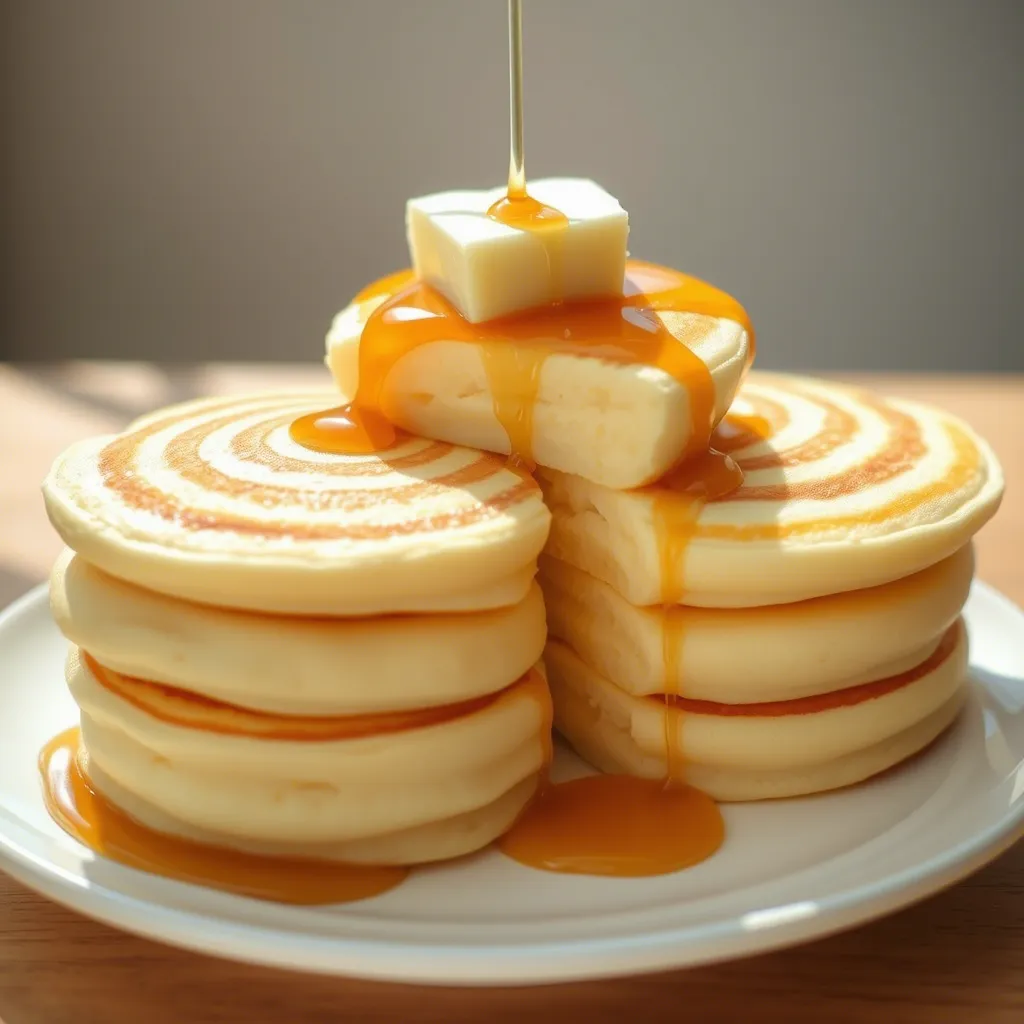
What makes these souffle pancakes so special? It’s all in the texture. Unlike traditional American pancakes that sit flat on your plate, these beauties stand tall and proud, with an interior so light and airy it’s like biting into a sweet, vanilla-scented cloud. They jiggle when you set the plate down—a delightful little dance that never fails to bring smiles to sleepy morning faces.
The magic happens when you separate the eggs and whip those whites into stiff, glossy peaks. This technique might sound fancy, but I promise it’s something you can master even before your first cup of coffee kicks in. And once you’ve tried it, this method will become second nature.
For busy moms and professionals who typically grab breakfast on-the-go, these pancakes offer a compelling reason to slow down. Yes, they take a bit more attention than popping bread in the toaster, but they’re the perfect centerpiece for those weekend mornings when you want to create a memory, not just a meal.
My daughter Emma used to be the pickiest breakfast eater—turning her nose up at most morning offerings. But the first time I placed a stack of these jiggly wonders in front of her, topped with fresh berries and a dusting of powdered sugar, her eyes widened. “They’re like pancake pillows!” she exclaimed before devouring every last bite. Now they’re her requested birthday breakfast every year.
What I particularly love is how impressive these look when served, despite requiring just pantry staples. Your family or guests will think you’ve been taking secret pastry chef classes when in reality, you’ve just mastered the art of egg whites and patience. And let’s be honest—who doesn’t enjoy a little breakfast showmanship now and then?
These pancakes also solve the common breakfast dilemma of heavy foods that leave you feeling sluggish. Despite their decadent appearance, they’re surprisingly light on the stomach, letting you enjoy a special breakfast without that brick-in-the-belly feeling afterward. It’s the perfect balance of indulgence and practicality.
The Story Behind These Fluffy Japanese-Style Soufflé Pancakes
My journey with these cloud-like confections began three years ago during a family trip to Tokyo. After standing in a line that wrapped around the block for a famous pancake shop in Harajuku, I watched in awe as the chef delicately flipped what looked like little soufflés on a griddle. When our order finally arrived at our table, the pancakes were still jiggling—actually jiggling!—and my children’s faces lit up like it was Christmas morning.
“How do they make them so fluffy?” my son asked between bites of the most ethereal pancake we’d ever tasted. I made it my mission to find out.
Back home, my kitchen quickly transformed into pancake central. There were early failures—pancakes that deflated faster than a punctured balloon, batters that were too runny, and a memorable disaster when I tried to rush the cooking process and ended up with pancakes that were simultaneously burnt and raw. My family lovingly dubbed these experiments “The Great Pancake Trials of 2022.”
But persistence pays off, especially in the kitchen. After countless weekends of tweaking and testing, I finally created a version that captured that magical Tokyo experience. When my kids declared them “even better than the ones in Japan” (though that might have been diplomatic kindness), I knew I had a winner.
Now, these pancakes have become our weekend tradition. My husband, who once claimed cooking was “not his department,” has even mastered them, though he insists on using a kitchen timer and treats the process with the seriousness of a science experiment.
What I’ve come to appreciate most about this recipe isn’t just the delicious result, but the way it forces us to slow down. You can’t rush these pancakes—they demand your attention and patience. In our constantly busy world, there’s something wonderfully centering about a recipe that cannot be hurried.
My kids now help with the process, taking turns to whip the egg whites (a task that conveniently burns off some morning energy) and watching with perpetual amazement as the batter transforms in the pan. We’ve turned cooking these pancakes into a family event rather than just breakfast preparation.
These Japanese pancakes have traveled beyond our kitchen too. I’ve made them for playdates, causing other moms to demand the recipe on the spot. I’ve prepared them for holiday brunches, where they’ve stolen the spotlight from dishes that took three times as long to prepare. And I’ve even taught my mother-in-law how to make them—a woman who previously believed that pancakes only came from a box mix.
So while these souffle pancakes might have originated in Japanese cafés, they’ve become an honorary member of our family’s food tradition. They remind us that sometimes the best things take a little extra time and care—a lesson worth learning over breakfast.
Ingredients
Let’s gather everything we need to make these cloud-like Japanese pancakes. The beauty of this recipe lies in its simplicity—you likely have most of these ingredients in your pantry already! Each component plays a crucial role in achieving that signature fluffy texture and delicate flavor.
For the Pancake Batter:
- 2 large eggs, separated (room temperature is key here, folks!)
- 3 tablespoons whole milk (the fat content helps with richness)
- ¼ teaspoon pure vanilla extract (use the real stuff, not imitation)
- ¼ cup all-purpose flour (measured correctly by spooning into measuring cups and leveling off)
- 2½ tablespoons granulated sugar (divided—some for yolks, some for whites)
- ¼ teaspoon baking powder (check that it’s fresh and active)
- ⅛ teaspoon cream of tartar (this stabilizes those egg whites beautifully)
- Pinch of salt (to enhance the sweetness)
- 1 tablespoon neutral oil for cooking (I prefer grapeseed or canola)
For Serving (Optional but Recommended):
- Fresh berries (strawberries, blueberries, or raspberries add beautiful color and tartness)
- Pure maple syrup (the real deal, not the flavored corn syrup version)
- A dusting of powdered sugar (for that picture-perfect finish)
- A small pat of butter (because some traditions are worth keeping)
- A dollop of lightly sweetened whipped cream (for extra indulgence)
Let’s talk about these ingredients and why they matter. The egg separation is non-negotiable—it’s the whipped whites that give these pancakes their characteristic height and fluffiness. If you’re new to separating eggs, do it when they’re cold (it’s easier), but then allow the separated eggs to come to room temperature before using. Room temperature egg whites whip to greater volume than cold ones.
Don’t have cream of tartar? While it’s ideal for stabilizing those egg whites, you can substitute a few drops of lemon juice or white vinegar. The acid helps the egg whites hold their structure during cooking, preventing the dreaded deflate.
The milk adds richness, but if you’re dairy-free, you can substitute almond or oat milk. I’ve tried both with success, though whole milk does produce the most tender result. If you’re feeling particularly decadent, replace half the milk with heavy cream—it’s not traditional, but it adds incredible richness.
For the flour, all-purpose works perfectly, but if you want an even lighter texture, you can substitute cake flour. Just remember that cake flour absorbs more liquid, so you might need to adjust the consistency slightly.
Vanilla extract brings warmth and depth to the flavor profile. If you want to get creative, try adding a drop of almond extract alongside the vanilla, or even a touch of lemon zest for a bright twist. During the holidays, I like to add a pinch of cinnamon and nutmeg for festive flair.
The sugar is divided between the egg yolk mixture and the whites. This isn’t just a quirk of the recipe—sugar helps stabilize the egg whites as they’re whipped, leading to a more stable foam structure that holds up during cooking.
Execution
Now comes the fun part: turning these simple ingredients into towering, jiggling works of art. Don’t be intimidated! I’ll break this down into manageable steps.
Step 1: Prepare Your Workspace Before you begin, gather all your ingredients and equipment. You’ll need two mixing bowls (one for yolks, one for whites), an electric mixer (hand or stand), a kitchen scale if you have one (for precision), a rubber spatula, a ¼-cup measuring cup or ice cream scoop, a non-stick pan with a lid, and cooking ring molds (2-3 inches in diameter).
No ring molds? No problem! Clean, empty tuna cans with both ends removed work wonderfully. In a pinch, you can even make free-form pancakes—they won’t be as tall, but they’ll still be delicious.
Step 2: Separate the Eggs Carefully separate your eggs, placing the whites in a completely clean, dry mixing bowl (any speck of fat will prevent proper whipping) and the yolks in a separate bowl. Let them sit until they reach room temperature—about 30 minutes if they were refrigerated.
Step 3: Make the Yolk Base In your bowl with the egg yolks, add 1 tablespoon of sugar, milk, and vanilla extract. Whisk until the mixture is pale yellow and slightly thickened. Sift in the flour and baking powder, then whisk until just combined. Be careful not to overmix—we’re not looking to develop gluten here.
Step 4: Whip Those Whites This is where the magic happens! Using a clean electric mixer, beat the egg whites with the cream of tartar until foamy. Gradually add the remaining 1½ tablespoons of sugar while continuing to beat. Keep going until you achieve stiff, glossy peaks that stand straight up when you lift the beaters. This usually takes 2-3 minutes on high speed.
How do you know when your whites are perfectly whipped? Try the “bowl over head” test—if you’re brave enough to invert the bowl over your head and nothing falls out, they’re ready! (Maybe don’t try this the first time if you’re wearing your favorite shirt.)
Step 5: Fold with Love Using a rubber spatula, gently fold one-third of the whipped egg whites into the yolk mixture to lighten it. This first addition doesn’t need to be super gentle. Then, with more care, fold in the remaining whites in two additions. The key word here is “fold”—not stir, not beat, but fold. Imagine you’re tucking the mixture into bed, with slow, deliberate movements to preserve as much air as possible.
Your finished batter should be light, airy, and voluminous, with no visible streaks of egg white. It will look almost like a cake batter but much lighter.
Step 6: Cooking—Where Patience Becomes a Virtue Heat your non-stick pan over the lowest possible heat. Yes, the lowest—these pancakes need gentle cooking to rise properly and cook through without burning. Lightly brush the inside of your ring molds with oil and place them in the pan to preheat.
Once the pan is heated (about 2 minutes on low), brush a thin layer of oil inside the rings. Fill each ring about halfway with batter—it will rise significantly, so don’t overfill! I find a ¼-cup measure or ice cream scoop works perfectly for portioning.
Step 7: The Covered Cook Add 1 teaspoon of water to the pan outside the rings (this creates steam) and immediately cover with a lid. Cook for about 4-5 minutes until the bottoms are golden and the tops begin to set.
Step 8: The Delicate Flip This is the trickiest part, but you’ve got this! Using a thin spatula and tongs (or heat-resistant fingers if you’re careful), gently flip each pancake along with its ring mold. Cook, covered again, for another 4-5 minutes until golden on the second side and cooked through.
Step 9: The Grand Reveal Turn off the heat and let the pancakes rest for 1 minute. Then, using your spatula and tongs again, carefully remove the rings. If they resist, run a thin knife around the edge to release the pancake.
Step 10: Serve Immediately These pancakes are at their jiggly best when fresh off the heat. Stack them on a plate, add your chosen toppings, and serve to your undoubtedly impressed audience.
For an elegant presentation recommended by Food Network, dust powdered sugar through a fine-mesh sieve held high above the plate for the lightest, most even coating. Add a sprig of mint for color, and voilà—restaurant-quality presentation in your home kitchen!
Additional Tips
Making these cloudlike souffle pancakes might seem like culinary wizardry, but with a few insider tips, you’ll be flipping these beauties like a pro in no time. Let me share some hard-earned wisdom from my many (many!) batches of these heavenly creations.
The Perfect Temperature Balance
Temperature control is absolutely crucial for these delicate pancakes. Too hot, and they’ll burn before cooking through; too cool, and they’ll deflate before setting. I’ve found that on most home stoves, “low” really means “the lowest setting possible.” If your pancakes are browning too quickly, don’t hesitate to temporarily remove the pan from the heat to let it cool down.
Some Japanese chefs actually cook these pancakes using a bain-marie method (a water bath) to ensure gentle, even heat. While that might be taking things a bit far for a family breakfast, it illustrates how important gentle cooking is for these fluffy treats.
Mastering the Egg White Peaks
The most common question I get about this recipe is about egg white stiffness. Under-whipping leads to pancakes that don’t rise properly, while over-whipping creates a dry, grainy texture that’s difficult to fold. The sweet spot is stiff peaks that hold their shape but still have a glossy appearance. If your egg whites start looking dull or chunky, you’ve gone too far.
A spotlessly clean bowl is non-negotiable here—even a tiny bit of grease will prevent proper whipping. I keep a lemon half in my kitchen and rub it around the inside of my mixing bowl before drying it thoroughly. The acid cuts through any residual oils and gives the egg whites a better environment to expand.
Makeshift Ring Molds
While proper ring molds are wonderful, I’ve had success with several creative alternatives. Besides the tuna can method I mentioned earlier, you can use:
- Large cookie cutters (the plainer the shape, the better)
- Cleaned-out food cans with both ends removed
- Special pancake molds from the baking section
- In a pinch, heavy-duty aluminum foil, folded several times and shaped into rings
Whatever you use, make sure to oil it thoroughly—these pancakes love to stick!
Storage and Reheating (Though They’re Best Fresh)
Let’s be honest—these pancakes are at their magnificent best straight from the pan. However, if you find yourself with leftovers (how?), they can be stored in an airtight container in the refrigerator for up to two days.
To reheat, avoid the microwave, which can make them tough and rubbery. Instead, place them on a baking sheet, cover loosely with foil, and warm in a 275°F oven for about 5-7 minutes. They won’t be quite as jiggly as fresh, but they’ll still taste wonderful.
Seasonal Variations
While the classic version is scrumptious year-round, I love adapting these pancakes to the seasons:
- Spring: Add a touch of lemon zest to the batter and top with fresh strawberries
- Summer: Fold in a tablespoon of blueberry purée for beautiful purple pancakes
- Fall: Add a pinch of cinnamon and nutmeg, and serve with sautéed apples
- Winter: Incorporate a drop of almond extract and top with pomegranate seeds for a festive breakfast
Troubleshooting Common Issues
Even experienced cooks encounter hiccups with these temperamental treats. Here are solutions to common problems:
Pancakes deflating before they’re fully cooked: Your heat might be too low, or your batter might have lost too much air during folding. Try a slightly higher heat, and be extra gentle when incorporating the egg whites.
Pancakes browning too quickly but raw inside: Your heat is too high. Remove from heat briefly, lower the temperature, and return to cooking with the lid on to help them cook through.
Batter overflowing the rings: You’re filling them too full. These pancakes rise dramatically—fill rings only about halfway.
Egg whites won’t stiffen: Ensure your bowl and beaters are absolutely clean and free of grease, your eggs are at room temperature, and you’re using fresh eggs (older eggs don’t whip as well).
FAQs
Can I make the batter ahead of time?
Unfortunately, these pancakes are divas that demand immediate attention. The egg white structure that gives them their magnificent height begins to deflate as soon as it’s folded into the batter. For best results, make and cook the batter right away. If you want to save time in the morning, measure out your dry ingredients the night before.
Can I make these pancakes without ring molds?
Absolutely! While ring molds give you that impressive height, you can make free-form versions by gently spooning the batter onto the pan. They won’t be as tall, but they’ll still be fluffier than traditional pancakes and taste just as delicious. Think of them as “souffle pancake lite.”
Why did my pancakes deflate when I flipped them?
Flipping too early is often the culprit here. Make sure the surface has set before attempting to flip—you should see small bubbles forming and the edges looking dry. Also, flip gently and swiftly; hesitation can cause collapse. Remember, these pancakes are more like soufflés than traditional pancakes!
Can I make these Japanese pancakes gluten-free?
Yes! I’ve successfully made them with a one-to-one gluten-free flour blend. The results are slightly less lofty but still delightful. Add an extra ⅛ teaspoon of baking powder to help with the rise.
How do I know when the insides are fully cooked?
Unlike regular pancakes where a toothpick test works well, these fluffy wonders are trickier to test. The best indicators are:
- The pancakes should feel set to a gentle touch
- They should spring back when lightly pressed
- If you’re uncertain, you can insert a thin skewer into the center—it should come out clean or with just a few moist crumbs
What can I do if I don’t have cream of tartar?
Cream of tartar helps stabilize the egg whites, but you can substitute an equal amount of white vinegar or lemon juice. The acid performs the same function of stabilizing the egg whites, though cream of tartar does give the most reliable results.
Can I double this recipe for a larger crowd?
Yes, but I’d recommend making multiple batches rather than doubling and cooking all at once. These pancakes are at their best when freshly made, and cooking too many simultaneously can lead to temperature management challenges. If you have multiple pans and ring molds (and perhaps a helper in the kitchen), you could have several batches going in parallel.
Are these pancakes really worth the extra effort compared to regular pancakes?
As someone who’s made thousands of pancakes in my lifetime, I can say with complete certainty: YES! While they do require more attention than your standard flapjack, the rewards are extraordinary. The first time you see the delighted expressions when you serve these towering, jiggling creations, you’ll understand why they’ve become a worldwide sensation. They transform an ordinary breakfast into a memorable experience.
According to a study by Bon Appétit, there’s actually science behind why we find fluffy foods so appealing—they trigger pleasure centers in our brains associated with comfort and satisfaction. So your attraction to these cloud-like creations isn’t just about taste—it’s practically hardwired into your psychology!
These japanese pancakes aren’t just breakfast—they’re kitchen magic that anyone can master with a little patience. They’ve become a beloved tradition in my home, and I hope they bring the same joy to yours. Whether for a special occasion breakfast, a weekend treat, or just because you deserve something extraordinary with your morning coffee, these fluffy soufflé pancakes deliver happiness on a plate.
Remember, the journey to perfect souffle pancakes might include a few less-than-perfect attempts, but even the “failures” will be delicious. As we say in my kitchen, “There are no mistakes, just unexpected variations.” So heat up that pan, whip those egg whites, and prepare for breakfast bliss!
Japanese pancakes: The cloud-like breakfast miracle that transforms ordinary mornings into special occasions. Quick to master, these jiggly treats offer the perfect balance of lightness and indulgence. Try them today!


