Why You’ll Love These Spring Pea and Mint Crostini
Let me tell you something about these Spring Pea and Mint Crostini that might just change your appetizer game forever. Picture this: it’s a warm spring afternoon, you’ve got friends coming over in an hour, and you’re staring into your fridge wondering what on earth you’re going to serve that isn’t the same old cheese plate. Enter these gloriously green, impossibly creamy pea crostini that look like you spent hours in the kitchen (spoiler alert: you didn’t!).
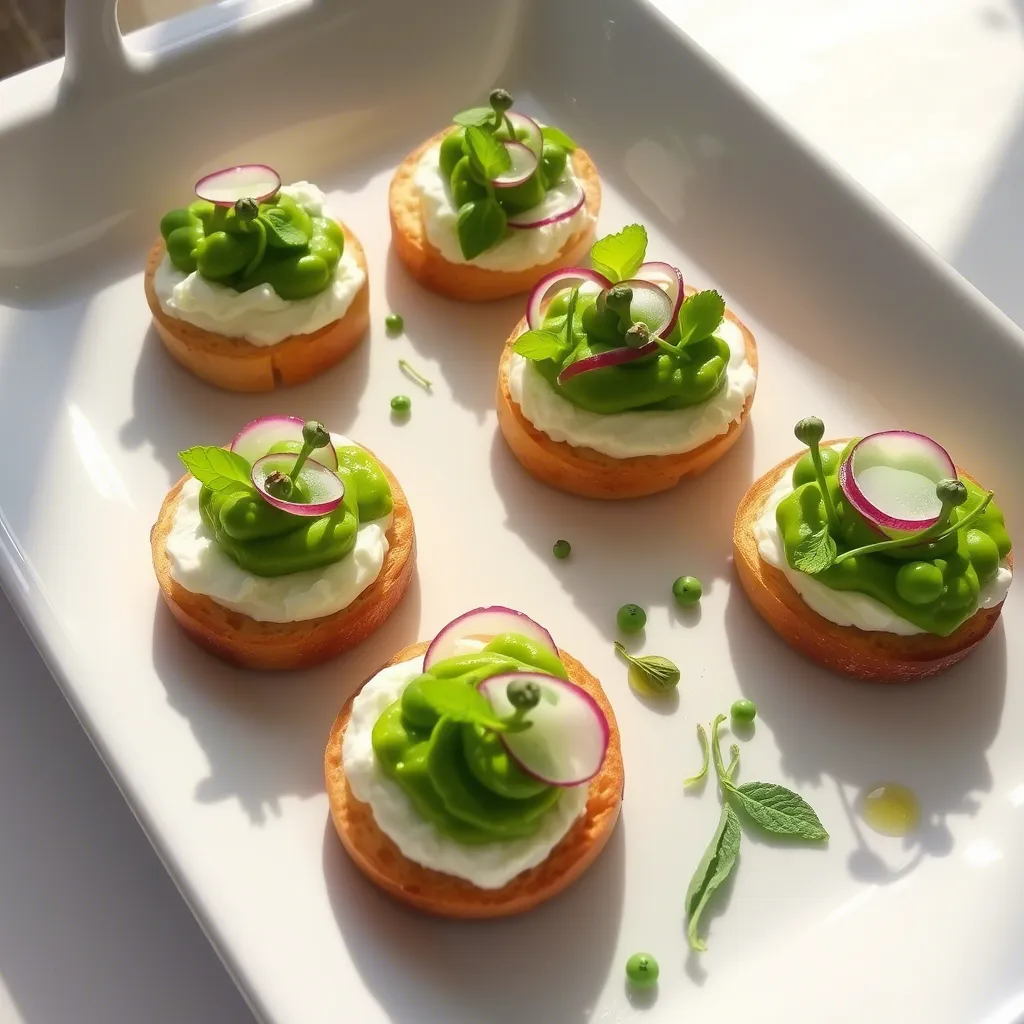
There’s something magical about the combination of sweet spring peas, fragrant mint, and pillowy whipped ricotta that makes these crostini irresistible. The vibrant green spread atop golden, crispy bread creates a presentation that’s both elegant and effortlessly casual – perfect for everything from impromptu gatherings to planned celebrations.
As a busy mom, I know the struggle of wanting to impress without spending precious hours in the kitchen. That’s exactly why these pea crostini have become my secret weapon. In just 30 minutes (yes, really!), you can have a platter of these beauties ready to serve. Most of the components can be prepared ahead of time, which is a lifesaver when you’re juggling work, kids’ activities, and trying to maintain some semblance of a social life.
The beauty of this recipe lies in its versatility. Having unexpected guests? These crostini will save the day. Planning a bridal shower? Arrange them on a beautiful platter and watch the compliments roll in. Need a light lunch that won’t weigh you down for the afternoon? Pair a few of these with a simple salad, and you’ve got a meal that’s both satisfying and energizing.
What I particularly love about this recipe is how it celebrates the vibrant flavors of spring. After months of heavy winter comfort foods, these bright, fresh crostini are like a breath of fresh air on your taste buds. The sweet peas, zippy lemon, and cooling mint create a perfect harmony that announces “spring has arrived!” even if the weather outside hasn’t quite gotten the memo yet.
The Story Behind These Spring Pea and Mint Crostini
The first time I made these Spring Pea and Mint Crostini was for a Mother’s Day brunch that I was hosting for my mom and mother-in-law. I wanted something that felt special but wouldn’t keep me trapped in the kitchen while everyone else enjoyed mimosas on the patio (we’ve all been there, right?).
I had picked up some beautiful fresh peas from the farmers market that morning, originally planning to make a simple side dish. But as I was unpacking my groceries, I realized I had all the ingredients for something a bit more exciting. My ricotta was nearing its expiration date, there was a bundle of mint threatening to wilt in the herb drawer, and a fresh baguette was sitting on my counter. It felt like the universe was conspiring to create these crostini!
Growing up, my grandmother always had a vegetable garden where peas were one of the first crops to emerge in spring. I have fond memories of sitting on her porch, helping to shell peas while she told stories about her childhood. That sweet, fresh flavor of just-picked peas is something that instantly transports me back to those simple, joyful moments. While my kids might roll their eyes at my nostalgia, they certainly don’t complain when these crostini appear on our dinner table!
The funny thing is, my oldest son – who claims to despise anything green – devoured three of these in one sitting before asking what was in them. When I revealed they were primarily made of peas, his jaw dropped. Now he requests “that green toast thing” at least twice a month, which I count as a major parenting victory. If you’re dealing with picky eaters, these might just be your secret weapon too!
I’ve served these crostini at countless gatherings since then, and they never fail to impress. There’s something about the combination of colors and textures that makes people think you’ve spent hours crafting them, when in reality, they come together in less time than it takes to watch an episode of your favorite show. Speaking of impressive yet easy recipes, my Fish Taco Bowls follow the same philosophy – maximum flavor with minimum effort!
What started as a simple way to use up ingredients in my fridge has become one of my signature appetizers. Friends now expect these crostini at spring gatherings, and I’m more than happy to oblige. After all, when something is this delicious and this simple to prepare, why wouldn’t you make it again and again?
Ingredients
Let’s talk about what goes into these gorgeous Spring Pea and Mint Crostini, because honestly, the simplicity of the ingredient list is part of their charm! You’ll need just a handful of quality components to create something truly spectacular.
For the star of the show – the vibrant pea spread – you’ll need:
- 2 cups of fresh or frozen peas (if using frozen, no need to thaw them first!)
- 2 tablespoons of fresh lemon juice
- 1/4 cup of fresh mint leaves, plus extra for garnish
- 2 tablespoons of extra virgin olive oil, plus more for drizzling
- 1 small garlic clove, roughly chopped
- 1/2 teaspoon of kosher salt
- 1/4 teaspoon of freshly ground black pepper
- A pinch of red pepper flakes (optional, but adds a lovely subtle heat)
For the whipped ricotta base:
- 1 cup of whole milk ricotta cheese (please, I beg you, don’t use the low-fat version here – the creaminess is worth it!)
- 2 tablespoons of extra virgin olive oil
- 1/2 teaspoon of lemon zest
- 1/4 teaspoon of kosher salt
And for the crostini:
- 1 baguette, sliced into 1/2-inch rounds (about 18-20 slices)
- 3 tablespoons of olive oil for brushing
- 1 garlic clove, peeled but left whole
For garnishing, consider adding:
- Thinly sliced radishes for a peppery crunch and pop of color
- Microgreens or pea shoots if you’re feeling fancy
- A drizzle of good quality olive oil
- Freshly cracked black pepper
- Flaky sea salt for that perfect finishing touch
Now, let’s talk substitutions because we all know that sometimes we’ve got to work with what we have! If fresh peas aren’t available, frozen peas work beautifully – they’re frozen at peak freshness and will give you that vibrant color and sweet flavor. In fact, I often prefer them for their convenience!
No mint on hand? Basil makes a wonderful alternative, creating more of an Italian-inspired flavor profile. You could even try a combination of herbs like parsley and chives for a different but equally delicious variation.
For the ricotta, if you’re feeling ambitious, homemade ricotta is incredibly easy to make and elevates this dish to new heights. But honestly, a good quality store-bought ricotta whipped until fluffy works perfectly well. In a pinch, you could substitute cream cheese or even a mild goat cheese, though each will give a different flavor profile.
The bread is flexible too! While a classic French baguette is traditional for crostini, you could use ciabatta, sourdough, or even a hearty multigrain bread. If you’re watching your carbs or need a gluten-free option, try serving the pea spread on cucumber rounds or endive leaves – equally delicious and beautiful!
Execution
Now that we’ve got our ingredients ready, let’s walk through the process of creating these stunning Spring Pea and Mint Crostini step by step. Don’t worry – there’s nothing complicated here, just a few simple techniques that yield impressive results!
First, let’s prepare the crostini:
- Preheat your oven to 375°F (190°C). Position a rack in the middle of the oven.
- Arrange your baguette slices in a single layer on a large baking sheet. Brush both sides lightly with olive oil.
- Bake for about 5-7 minutes, then flip each slice and bake for another 3-5 minutes until they’re golden and crisp around the edges but still slightly soft in the center.
- While they’re still warm, rub one side of each slice with the whole garlic clove. This gives a subtle garlic flavor without overwhelming the delicate pea spread.
- Allow the crostini to cool completely on a wire rack. If you’re making these ahead, store them in an airtight container once cooled. They’ll stay crisp for 1-2 days!
Next, let’s make that gloriously creamy whipped ricotta:
- In a food processor or using a hand mixer, combine the ricotta, olive oil, lemon zest, and salt.
- Process for about 2 minutes until the ricotta becomes smooth and fluffy – it should look like a soft cloud!
- Transfer to a bowl, cover, and refrigerate until ready to use. This can be made up to 2 days ahead of time.
Now for the vibrant pea and mint spread:
- Bring a medium pot of salted water to a boil. If using fresh peas, add them to the boiling water and cook just until tender, about 2-3 minutes. Drain and immediately plunge into an ice bath to stop the cooking and preserve that bright green color.
- If using frozen peas, you can either blanch them quickly (about 1 minute) or simply thaw them under cool running water. The key is not to overcook them – we want that fresh, vibrant flavor!
- In a food processor, combine the peas, lemon juice, mint leaves, olive oil, chopped garlic, salt, pepper, and red pepper flakes if using.
- Pulse until the mixture is well combined but still has some texture – we’re not looking for baby food here! Think of it more like a rough spread with some peas still partially intact for that lovely textural contrast.
- Taste and adjust seasoning as needed. Sometimes I add a touch more lemon juice if the peas are particularly sweet, or a bit more salt if they need brightening up.
The assembly is where the magic happens, though you can find even more magic in these Incredible Homemade Pesto recipes that can elevate so many dishes! Back to our crostini:
- Spread a generous layer of whipped ricotta on each cooled crostini – about 1-2 teaspoons per piece.
- Top with a spoonful of the pea and mint mixture – don’t be shy here!
- Garnish with thinly sliced radishes, additional mint leaves, microgreens, a light drizzle of olive oil, a few grinds of black pepper, and a sprinkle of flaky sea salt.
According to Bon Appétit’s guide to perfect crostini, the key to perfect assembly is building your crostini just before serving to prevent them from becoming soggy. If serving at a party, consider setting up a “crostini bar” with the base ingredients and let guests assemble their own – it’s interactive and ensures each crostini is perfectly crisp!
Arrange your finished crostini on a serving platter, step back, and prepare for the compliments to roll in. These beauties taste as good as they look, and no one needs to know how easy they were to make!
Additional Tips
Let’s dive into some extra nuggets of wisdom that’ll take your Spring Pea and Mint Crostini from merely delicious to absolutely unforgettable! After making these countless times (and working through a few hiccups along the way), I’ve gathered some game-changing tips that’ll ensure success every single time.
First, let’s talk make-ahead strategies, because we all know that entertaining is stressful enough without trying to assemble delicate appetizers while your guests are arriving! The beauty of these crostini is that nearly every component can be prepared in advance:
- The crostini base can be toasted up to 2 days ahead and stored in an airtight container at room temperature.
- The whipped ricotta can be made up to 2 days ahead and refrigerated. Just give it a quick stir before using to loosen it up if it’s become firm.
- The pea and mint spread can be made 1 day ahead and refrigerated. Bring it to room temperature before assembling and add a splash of olive oil if it needs refreshing.
- For ultimate freshness, hold off on final assembly until shortly before serving – this prevents the bread from becoming soggy.
Temperature matters more than you might think! The pea spread is most vibrant and flavorful at room temperature, not cold from the fridge. If you’ve made it ahead, be sure to pull it out about 30 minutes before serving to let the flavors bloom. Cold temperatures dull flavors, while room temperature lets all those bright, spring notes shine through.
Speaking of flavors, here’s a professional chef trick I learned: add a tiny pinch of sugar to your pea mixture if your peas aren’t naturally sweet enough. This is especially helpful if you’re making these out of season with frozen peas that might not have that natural spring sweetness. Just a pinch – we’re enhancing, not making dessert!
For a stunning presentation variation, try creating a “deconstructed” version for a dinner party. Spread the whipped ricotta on a beautiful platter, spoon the pea mixture over half of it, and scatter your garnishes artfully across the top. Serve the toasted baguette slices alongside for guests to build their own – it’s interactive, impressive, and eliminates any worry about soggy bread!
Storage solutions matter if you happen to have leftovers (though I rarely do!). The pea spread will keep beautifully in the refrigerator for up to 3 days and actually makes an amazing sandwich spread or pasta sauce when thinned with a bit of pasta water. Nothing goes to waste in my kitchen, and this versatile spread ensures you’ll use every last bit!
Texture is key to perfect crostini, and it’s all about balance. The bread should be toasted enough to support the toppings without being so hard that it shatters when bitten. If your crostini have become too crisp, no worries! A light brush with olive oil will soften them slightly without making them soggy.
For those who want to play with variations, the basic formula opens up endless possibilities. Try adding crumbled feta to the pea mixture for a tangy punch, or swap half the peas for blanched fava beans or edamame. Add a few leaves of tarragon to the herb mix for a subtle licorice note that pairs beautifully with the sweet peas. You can even add a sprinkle of crispy pancetta or prosciutto on top if serving to meat lovers!
If you’re serving these at an outdoor gathering during warmer months, consider keeping them in a cooler spot or bringing them out in small batches. The ricotta base can soften quickly in high heat, and nobody wants a drippy crostini situation! For more summer-friendly recipes, check out my Classic Cucumber and Tomato Salad that pairs perfectly with these crostini.
FAQs
Can I use frozen peas instead of fresh for the pea crostini spread?
Absolutely! In fact, frozen peas are my go-to for this spring appetizer most of the time. They’re flash-frozen at peak freshness, which means they often have better flavor than out-of-season “fresh” peas that have been sitting in transit or on store shelves. The key is not to overcook them – a quick blanch for about a minute is all they need before shocking in ice water to preserve that vibrant green color.
How far in advance can I make these spring pea and mint crostini?
While I recommend assembling the final crostini shortly before serving, almost everything can be prepped ahead of time. The toasted bread can be made 2 days ahead and stored in an airtight container. The whipped ricotta and pea spread can both be refrigerated for up to 24 hours. Just bring the pea spread to room temperature before assembling, and you’ll be good to go!
My whipped ricotta isn’t getting smooth and fluffy. What am I doing wrong?
This is a common issue with a simple fix! First, make sure you’re using whole milk ricotta, as low-fat versions don’t whip up as nicely. Second, drain the ricotta if it seems watery – place it in a fine-mesh sieve lined with cheesecloth for about an hour before whipping. Finally, ensure you’re processing it long enough – it takes about 2 minutes of continuous whipping to achieve that cloud-like texture.
What can I serve with pea crostini to create a complete appetizer spread?
These whipped ricotta crostini work beautifully as part of a larger appetizer assortment. For a spring-themed spread, pair them with Roasted Tomato Salsa for a color contrast, some marinated olives, a cheese board with seasonal fruits, and perhaps some charcuterie. The fresh, green notes of the pea crostini balance nicely with more robust flavors.
Can I make these spring appetizers gluten-free?
Definitely! While traditional crostini are made with wheat-based bread, you have several options for gluten-free alternatives. Use a good quality gluten-free baguette or crackers as your base. Alternatively, try some naturally gluten-free vehicles like endive leaves, cucumber rounds, or even small roasted potato slices as your “crostini” base. According to Celiac Disease Foundation, all other ingredients in this recipe (peas, mint, ricotta, etc.) are naturally gluten-free.
The pea spread isn’t as vibrant green as I expected. How can I fix this?
The vibrant color comes from properly blanching the peas and not overcooking them. If your spread isn’t bright green, it’s likely the peas were cooked too long. Make sure to plunge them immediately into ice water after blanching to stop the cooking process and preserve the color. Adding a bit more fresh mint can also brighten the color, as can a squeeze of additional lemon juice, which prevents oxidation.
Can I use other herbs instead of mint in this recipe?
While mint and peas are a classic pairing that screams “spring,” you can absolutely experiment with other herbs. Basil creates a more Italian-inspired flavor profile, while tarragon adds a subtle anise note that’s quite sophisticated. A mixture of parsley, chives, and a touch of dill also works beautifully. Feel free to customize based on what you have on hand or your personal taste preferences!
Spring is the perfect season for entertaining, and these Pea Crostini with Whipped Ricotta embody everything I love about this time of year – vibrant colors, fresh flavors, and the joy of sharing good food with friends and family. The combination of sweet peas, fragrant mint, and creamy ricotta creates a perfect bite that’s sure to impress without keeping you trapped in the kitchen. Whether you’re hosting a casual gathering or looking for a show-stopping appetizer for a special occasion, these crostini deliver both beauty and flavor in each perfectly balanced bite.


