Why You’ll Love This Crispy Honey Garlic Tofu
Let’s be honest – tofu doesn’t always get the love it deserves. But this crispy tofu recipe is about to change everything you thought you knew about this humble protein. As a busy mom juggling soccer practice drop-offs and deadline-packed workdays, I understand the dinner dilemma all too well. You want something nutritious that doesn’t taste like you’re punishing your taste buds, right?
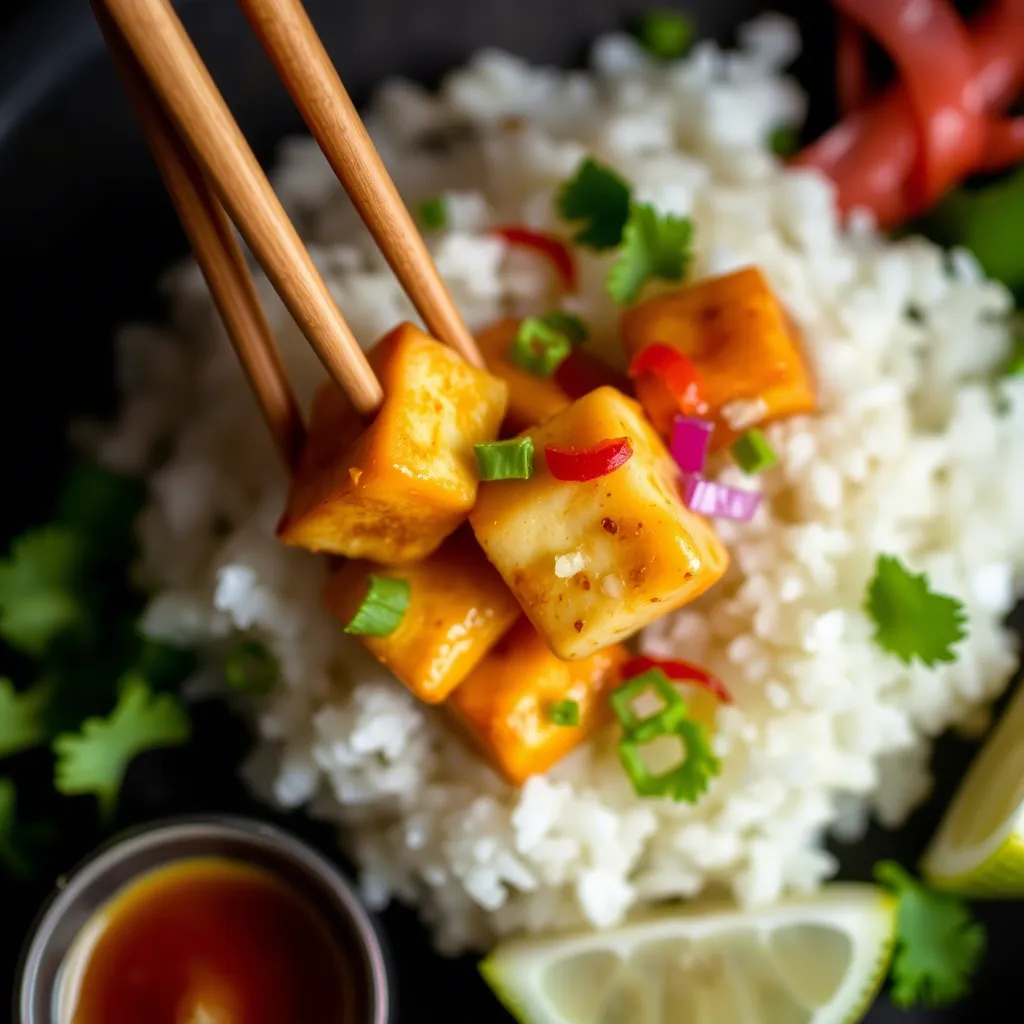
This Crispy Honey Garlic Tofu with Coconut Rice is the answer to that “it’s 5 PM and I have no dinner plan” panic we’ve all experienced. The tofu exterior develops this incredible crackly crust that shatters satisfyingly with each bite, while the interior stays tender and ready to soak up that sticky-sweet honey garlic sauce. And the coconut rice? It’s like a fluffy cloud that was meant to catch every drop of that glorious sauce.
What makes this recipe a weeknight superhero is how it manages to be both quick and impressive. You can have it on the table in 45 minutes flat, with most of that time being hands-off. It’s the dinner equivalent of showing up to a meeting in sweatpants but somehow looking like you’re wearing a power suit.
For those of you with picky eaters at home (I see you, and I stand with you in solidarity), this dish has worked miracles in my household. There’s something about the sweet-savory balance that appeals to even the most vegetable-suspicious family members. My daughter, who once declared tofu “looks like sad cheese,” now requests this dish by name.
The beauty of this recipe also lies in its flexibility. Had a rough day? The satisfying process of pressing tofu and hearing that sizzle when it hits the pan is surprisingly therapeutic. Running late? Skip a few steps and take some shortcuts I’ll share later. Need to clean out the fridge? This dish welcomes whatever vegetables you need to use up.
Health-conscious folks will appreciate that this crispy tofu recipe delivers protein-packed satisfaction without the heaviness that follows many comfort food options. It’s plant-based without screaming “I’M PLANT-BASED!” at your dinner guests. Instead, it whispers it seductively while they’re too busy enjoying the flavor party happening in their mouths to notice they haven’t touched meat all evening.
And can we talk about the aroma? When that honey garlic sauce starts bubbling away, your kitchen transforms into an aromatic wonderland that will have family members mysteriously appearing from all corners of the house asking, “What smells so good?” There’s no scented candle on earth that can compete with this fragrance – I’d bottle it if I could.
The meal also hits that perfect intersection of “impressive enough for guests” and “easy enough for Monday night.” The vibrant colors alone make for an Instagram-worthy plate, but unlike some pretty foods that leave you reaching for a snack an hour later, this dish has staying power. It’s the kind of satisfying meal that has you pushing back from the table with a contented sigh, not immediately wondering what’s in the pantry for dessert.
The Story Behind This Crispy Honey Garlic Tofu
Some recipes come from dusty family cookbooks passed down through generations. Others from fancy culinary school techniques. This one? It was born from what I like to call a “refrigerator emergency” – that moment when you realize you’ve forgotten to grocery shop and must somehow conjure dinner from whatever random ingredients are lurking in your kitchen.
It was a Wednesday evening about three years ago, the kind where everything that could go wrong had gone wrong. My meeting ran late, the dog had destroyed a pillow, and my dinner plans had imploded when I realized the chicken I’d planned to cook had seen better days. All I had was a block of tofu that had been sitting in my refrigerator with no particular purpose, some rice in the pantry, and a determination not to order takeout for the third time that week.
Like many home cooks, my relationship with tofu had been complicated. I’d tried it in various forms – scrambled, blended into smoothies, even crumbled into pasta sauce to sneak more protein into my children’s diets. But it had never been the star of the show, never the thing that made everyone at the table fall silent because they were too busy enjoying their food to talk. That was about to change.
I remembered reading somewhere that the secret to crispy tofu was removing as much moisture as possible. So there I was, pressing tofu between kitchen towels with my heaviest cookbook on top (ironically, it was a meat cookbook – sometimes life has a sense of humor), while simultaneously trying to figure out what flavors I could coax from my pantry.
Honey, garlic, soy sauce, and a bit of sriracha made their way onto my counter. Basic ingredients, yes, but together they create something magical. The first time I made this sauce, I actually burned it slightly because my youngest called me away to referee some urgent toy dispute. That happy accident led to the caramelized edges that now define this dish.
The coconut rice came into the picture a few weeks later when a friend brought over a Thai-inspired meal that paired coconut rice with spicy protein. One bite and I knew my tofu had found its perfect match. Like any good relationship, each element brings out the best in the other – the creamy rice softening the punch of the sauce, while the crispy tofu provides textural contrast to the tender grains.
When my kids ask for this meal prep for beginners weekly, I know I’ve struck culinary gold. There’s no higher compliment than a family that eats without complaint, without negotiating how many more bites until dessert. My oldest son, who once claimed to “hate all foods that aren’t pizza,” now asks for this by name when friends come over. He proudly tells them, “My dad makes the best tofu ever,” which, if you’re a parent, you know feels better than any professional cooking award could.
What started as a dinner emergency has become our family’s comfort food, our celebration meal, and sometimes, on particularly exhausting days, our reminder that good things can come from chaotic situations. The recipe has evolved over time, with small tweaks and adjustments based on what worked and what didn’t. The version I’m sharing with you today represents countless family dinners, feedback sessions (“More sauce, Dad!”), and the kind of kitchen alchemy that happens when necessity meets inspiration.
Ingredients
Let’s gather everything you’ll need to create this crispy tofu recipe that’s about to revolutionize your weeknight dinner rotation. I’ll break down each ingredient and explain why it matters, along with some possible substitutions for when your pantry isn’t cooperating.
For the Crispy Tofu:
- 1 block (14-16 oz) extra-firm tofu: This is non-negotiable – the firmer your tofu, the crispier the result. Extra-firm tofu has less water content, which means better browning. In a pinch, firm tofu will work, but you’ll need to press it longer.
- 3 tablespoons cornstarch: The secret weapon for achieving that restaurant-quality crispiness without deep frying. Arrowroot powder works as a 1:1 substitute if you’re avoiding corn products.
- 1 tablespoon nutritional yeast (optional): This adds a subtle umami depth that makes the tofu more satisfying. If you don’t have it, no worries – your tofu will still be delicious.
- ½ teaspoon garlic powder: Because garlic in every form is welcome at this flavor party. Fresh minced garlic can burn when cooking at high heat, so the powder ensures even flavor without bitterness.
- ¼ teaspoon black pepper: Freshly ground makes a difference here – those little flavor capsules release their aromatic oils when cracked.
- ¼ teaspoon salt: I prefer kosher salt for its clean flavor, but whatever you have works fine.
- 2-3 tablespoons vegetable oil: For pan-frying. Use an oil with a high smoke point – avocado oil is my preference, but canola or grapeseed work beautifully too.
For the Honey Garlic Sauce:
- ¼ cup honey: The star of our honey garlic sauce. For a vegan option, maple syrup creates a slightly different but equally delicious flavor profile. Agave nectar works too, though it’s a bit thinner.
- 4 cloves garlic, minced: Yes, four whole cloves. Trust me on this – they mellow and sweeten as they cook. If you’re really in a time crunch, 2 teaspoons of pre-minced garlic will do.
- 3 tablespoons low-sodium soy sauce: I specify low-sodium because we want control over the saltiness. If you only have regular soy sauce, reduce to 2 tablespoons and add a splash of water.
- 1 tablespoon rice vinegar: This brightens the sauce with acidity. Apple cider vinegar is an acceptable substitute, though slightly stronger in flavor.
- 1 teaspoon sesame oil: A little goes a long way to add that distinctive nutty flavor. There’s no real substitute for this, but if you must omit it, add an extra teaspoon of vegetable oil.
- 1-2 teaspoons sriracha (optional): For those who like a gentle heat. Adjust according to your spice tolerance or omit entirely for spice-sensitive eaters.
- 1 teaspoon grated fresh ginger: Adds a warming zing that balances the sweetness. In a pinch, ¼ teaspoon ground ginger will work.
- 1 tablespoon cornstarch mixed with 2 tablespoons water: This slurry thickens the sauce to that perfect clingy consistency that coats the tofu beautifully.
For the Coconut Rice:
- 1 cup jasmine rice: Its fragrant nature complements the coconut milk perfectly. Basmati or any long-grain white rice will work as alternate options.
- 1 can (13.5 oz) coconut milk: Full-fat gives the richest result, but light coconut milk works if you’re watching calories. Just know the rice won’t be quite as creamy.
- ½ cup water: To ensure the rice cooks properly without being too heavy.
- ¼ teaspoon salt: Just enough to enhance the coconut flavor without making it salty.
For Garnish:
- 3 green onions, thinly sliced: These add a fresh pop of color and mild onion flavor.
- 1 tablespoon toasted sesame seeds: For a nutty crunch and visual appeal.
- Fresh cilantro leaves (optional): I know cilantro is controversial – if you’re in the “tastes like soap” camp, substitute with Thai basil or just add extra green onions.
- Lime wedges for serving: The hit of acid brightens everything and balances the sweet sauce.
What makes this ingredient list special is how ordinary pantry staples transform into something extraordinary when combined. Most items can be found at any grocery store, with perhaps only nutritional yeast requiring a special trip to a health food store (and remember, it’s optional).
Execution
Now that our ingredients are lined up and ready to go, let’s transform them into that crispy, saucy delight you’re craving. I’ve broken this process into clear steps that even novice cooks can follow with confidence.
Step 1: Prep the Tofu (15 minutes) First, we need to remove excess moisture from the tofu – this is absolutely crucial for achieving that perfect crisp. Open the tofu package and drain off the water. Wrap the tofu block in a clean kitchen towel or several layers of paper towels. Place something heavy on top – a cast iron skillet or a cutting board with a few canned goods works perfectly. Let it press for at least 15 minutes, longer if you have time. While that’s happening, prepare your rice (see Step 2).
After pressing, unwrap the tofu and pat it dry again. Cut it into 1-inch cubes. Try to make them uniform in size so they cook evenly – think of them as bite-sized flavor vessels that will soon be coated in that glorious honey garlic sauce.
Step 2: Start the Coconut Rice (5 minutes + 20 minutes cooking) While your tofu is pressing, get your coconut rice going. Rinse the jasmine rice in cold water until the water runs clear – this removes excess starch and prevents gumminess. In a medium saucepan, combine the rinsed rice, coconut milk, water, and salt.
Bring the mixture to a boil over medium-high heat, then immediately reduce to a low simmer and cover with a tight-fitting lid. Cook for 18-20 minutes without peeking! Seriously, resist the urge to lift that lid – the steam is doing important work in there. When the time is up, remove from heat but keep covered for another 5 minutes to allow the rice to finish steaming.
Step 3: Coat and Cook the Tofu (15 minutes) In a medium bowl, whisk together cornstarch, nutritional yeast (if using), garlic powder, black pepper, and salt. Add your tofu cubes and gently toss until they’re evenly coated. I like to use a large ziplock bag for this – add the dry ingredients, followed by the tofu, seal it with some air inside, and gently shake. It’s like a tiny tofu dance party in there.
Heat your vegetable oil in a large non-stick or cast-iron skillet over medium-high heat until shimmering. You want it hot but not smoking – test by adding a tiny pinch of cornstarch; it should sizzle immediately.
Carefully add your coated tofu cubes, making sure they’re not touching each other. This is where patience becomes a virtue – don’t crowd the pan or the tofu will steam rather than crisp. Work in batches if necessary. Let each piece cook undisturbed for 2-3 minutes before checking the bottom. When golden brown, gently flip each piece and continue cooking until all sides are crispy and golden, about 8-10 minutes total. According to Bon Appétit magazine, leaving food undisturbed while browning creates the best crust, so resist the urge to constantly stir.
Step 4: Make the Honey Garlic Sauce (5 minutes) While your tofu is crisping up (or after, if you’re a one-thing-at-a-time cook), prepare your sauce. In a small bowl, combine honey, minced garlic, soy sauce, rice vinegar, sesame oil, sriracha (if using), and grated ginger. Whisk until well combined.
In a separate tiny bowl, mix your cornstarch with water to create a slurry – this will thicken the sauce to that perfect consistency that clings lovingly to each tofu cube.
Step 5: Combine and Finish (5 minutes) Once your tofu is crispy on all sides, reduce the heat to medium-low. Pour in your honey garlic mixture and stir gently to coat the tofu. The sauce will start to bubble and thicken almost immediately.
When the sauce starts to bubble, add your cornstarch slurry and continue stirring gently for about 1 minute. The sauce should thicken enough to coat the back of a spoon – what professional chefs call “nappe” consistency. If it gets too thick, add a tablespoon of water to thin it slightly.
Step 6: Fluff the Rice and Serve Finally, fluff your coconut rice with a fork. The grains should be tender and infused with that subtle coconut flavor.
To serve, create a bed of coconut rice on each plate, top with the crispy honey garlic tofu, and spoon any extra sauce over the top. Sprinkle with sliced green onions, toasted sesame seeds, and cilantro leaves if using. Place a lime wedge on the side for squeezing over the dish right before eating.
What you now have before you is a symphony of textures and flavors – crispy tofu, sticky-sweet sauce, and creamy coconut rice that come together in perfect harmony. The entire process takes about 45 minutes, but each component can be prepped ahead of time if you want to streamline your dinner routine even further. Find more time-saving tips at these easy weeknight dinner recipes.
Additional Tips
Now that you’ve mastered the basic recipe for this crispy tofu recipe, let’s explore some ways to elevate it, troubleshoot common issues, and adapt it to different dietary needs or what you have on hand. After all, the best recipes are the ones that become your own through personalization and practice.
First, let’s talk about tofu selection and preparation, which can make or break this dish. When shopping for tofu, give the package a gentle squeeze – it should feel firm with minimal give. Some brands are naturally firmer than others; I’ve found Trader Joe’s and Nasoya extra-firm varieties to be consistently good performers. If your grocery store only carries softer options, you can still make this work by extending the pressing time. Try the freezer trick: freeze your tofu block solid, then thaw completely before pressing. This creates pockets in the tofu that release water more easily and creates an even meatier texture.
For the crispiest results, make sure your tofu is thoroughly dried after pressing. I sometimes put the cubes on a paper towel-lined plate and pop them in the refrigerator, uncovered, for 30 minutes. This extra step draws out even more moisture, resulting in tofu that crisps up like a dream. If you’re really serious about your crispy tofu game, consider investing in a tofu press – they’re relatively inexpensive and save both time and paper towels.
The cornstarch coating is another area where you can play around. For extra crunch, try a 50/50 mix of cornstarch and rice flour. For flavor variations, add different spices to the coating mixture – a pinch of five-spice powder gives an Asian flair, while smoked paprika adds a subtle BBQ note. Just remember that spices can burn if the heat is too high, so adjust your cooking temperature accordingly.
Speaking of heat, let’s address a common issue: uneven browning. If you find your tofu browns too quickly on the outside before crisping properly, your heat is likely too high. The sweet spot is medium-high, and it’s better to cook a bit longer at a slightly lower temperature than to rush and end up with tofu that’s burnt outside and soft inside. A well-seasoned cast-iron skillet gives the best results, but any heavy-bottomed non-stick pan will work well.
Now, let’s talk sauce variations. The basic honey garlic sauce is a crowd-pleaser, but don’t be afraid to experiment. Add a tablespoon of orange zest and juice for a citrusy twist, or stir in a tablespoon of peanut butter for a rich, satay-like sauce. For a Korean-inspired version, add a tablespoon of gochujang (Korean chili paste) – it adds incredible depth and a gentle heat that builds rather than overwhelms.
If you’re cooking for someone with dietary restrictions, here are some adaptations:
- Vegan: Substitute maple syrup or agave nectar for honey
- Gluten-free: Use tamari or coconut aminos instead of soy sauce
- Lower-sugar: Reduce honey to 2 tablespoons and add 1 tablespoon of water
- Nut allergies: Skip the sesame oil and seeds, and garnish with pumpkin seeds instead
Let’s talk meal prep, because this dish is surprisingly freezer-friendly if handled correctly. The tofu can be pressed and cut in advance, then stored in the refrigerator for up to 2 days. The sauce ingredients can be combined (except for the cornstarch slurry) and refrigerated for up to a week. For complete make-ahead meals, I recommend keeping the components separate: store the cooked tofu and sauce separately from the rice, then reheat and combine just before serving. According to a study from the International Journal of Food Sciences and Nutrition, properly stored cooked rice should be eaten within 3-4 days for optimal safety and quality.
For the coconut rice, don’t worry if you don’t have jasmine rice – any long-grain rice will work, though the texture and fragrance will vary slightly. If you’re watching calories, you can use light coconut milk mixed with water (half and half), though the creaminess will be reduced. A fun variation is to add a tablespoon of lime zest to the rice before cooking, which brightens the flavor and complements the coconut beautifully.
Here’s a professional chef’s secret I learned from an Asian cooking class: for next-level crispy tofu, after pressing and before coating with cornstarch, simmer the tofu cubes in salted water for 2 minutes, then drain and dry thoroughly. This seasoning step flavor-infuses the tofu from the inside out and actually helps it crisp up better.
Storage is straightforward but specific: refrigerate leftovers in an airtight container for up to 3 days. The tofu will lose some crispness upon refrigeration, but you can revive it by reheating in a dry skillet or the oven at 350°F for about 5 minutes. The microwave works in a pinch, but the texture won’t be quite the same.
Finally, let’s talk serving suggestions. While this dish is complete on its own, it pairs beautifully with simple steamed or roasted vegetables like broccoli, snap peas, or bell peppers. For a restaurant-quality presentation, serve family-style on a large platter with the tofu and sauce over the rice, garnished generously with green onions, cilantro, and a scattering of sesame seeds. Place lime wedges around the edge of the platter for guests to add as they please.
FAQs
How do I know when my tofu is pressed enough?
Your tofu block should reduce in thickness by about 1/3 and feel noticeably firmer to the touch. Any water puddles should be minimal when you lift the weight. Generally, 15-20 minutes is sufficient for extra-firm tofu, but up to 30 minutes will give you even better results. If you’re using firm rather than extra-firm tofu, press for at least 30 minutes, changing the towels halfway through.
My tofu always sticks to the pan. What am I doing wrong?
This usually happens when either the pan isn’t hot enough before adding the tofu, or you’re trying to flip it too soon. Make sure your oil is shimmering hot, then add the tofu and don’t touch it for at least 2-3 minutes. It should release easily when a crust has formed. Additionally, ensure your tofu is well-coated with cornstarch and your pan has enough oil – about 2 tablespoons for a 12-inch skillet.
Can I air-fry the tofu instead of pan-frying?
Absolutely! Air-frying works beautifully for this crispy tofu recipe. Preheat your air fryer to 375°F, lightly spritz the cornstarch-coated tofu cubes with oil, and cook for 10-15 minutes, shaking the basket halfway through. You’ll then need to transfer the crispy tofu to a skillet to combine with the sauce, as air fryers aren’t suitable for sauce reduction.
How can I make this dish spicier?
There are several ways to amp up the heat. The easiest is to increase the sriracha in the sauce to 1-2 tablespoons. You can also add 1/4 teaspoon of crushed red pepper flakes to the sauce, or for serious heat-seekers, mix in a finely diced fresh chili like Thai bird’s eye or habanero. Remember that the spice level intensifies as the sauce reduces, so taste and adjust carefully.
Is there a way to make the honey garlic sauce ahead of time?
Yes! The sauce can be prepared up to 5 days in advance and stored in an airtight container in the refrigerator. Just don’t add the cornstarch slurry until you’re ready to use it. When you’re ready to cook, bring the sauce to room temperature, then proceed with the recipe as directed. The garlic flavor will actually develop and mellow over time, creating an even more complex sauce.
Why did my sauce become gloopy rather than glossy?
Too much cornstarch or cooking the sauce too long after adding the slurry can result in a gloopy texture. The key is to add the slurry gradually, stirring constantly, and removing from heat as soon as it reaches your desired thickness. If your sauce does thicken too much, simply whisk in a tablespoon of water at a time until you reach the perfect consistency.
Can I use frozen tofu for this recipe?
Not only can you use frozen tofu, but freezing and thawing tofu before pressing actually creates a more porous structure that absorbs flavors better and yields an even meatier texture. Just be sure to thaw completely and press thoroughly to remove all excess moisture before proceeding with the recipe.
This Crispy Honey Garlic Tofu with Coconut Rice has become one of my most requested recipes, and for good reason. It transforms humble tofu into a crave-worthy meal that satisfies on every level – texture, flavor, and visual appeal. The combination of crispy exterior, tender interior, and that irresistible sticky-sweet honey garlic sauce over coconut-infused rice creates a dish that will win over even the most dedicated tofu skeptics.
What I love most about sharing this crispy tofu recipe is how it opens people’s minds to the possibilities of plant-based cooking. It’s not about mimicking meat or apologizing for what it isn’t – it’s a celebration of what tofu can be when treated with respect and creativity. And that, my friends, is the true art of cooking: taking simple ingredients and transforming them into something that brings joy to your table.
So go ahead, press that tofu, whisk that sauce, and prepare to amaze your family and friends with what might just become your new signature dish. As always, cooking is about making it your own, so don’t be afraid to experiment and adapt this recipe to suit your tastes. After all, the most delicious meals are the ones made with confidence and a dash of personal flair. You can find more inspiration for plant-based cooking at Plant-Based on a Budget, a wonderful resource for affordable meat-free meals.


