Have you ever wanted to make a dessert that looks like you spent hours in the kitchen but actually takes less than 20 minutes of hands-on time? Let me introduce you to panna cotta, the silky Italian dessert that will make your family think you’ve been taking secret pastry classes.
As a busy mom who still wants to put something special on the table, panna cotta has become my secret weapon. This creamy, dreamy dessert looks fancy enough for company but is actually one of the most forgiving recipes in my arsenal. No complicated techniques, no fussy ingredients—just pure, simple deliciousness that melts in your mouth.
Why You’ll Love This Panna Cotta
There’s something magical about the way panna cotta jiggles ever so slightly on the spoon before dissolving into silky goodness. It’s a dessert that manages to be both light and decadent at the same time—a rare feat in the dessert world!
What I love most about panna cotta is its incredible versatility. Think of it as your dessert blank canvas. The creamy base carries whatever flavor you’re in the mood for, and the topping options are endless. Fresh summer berries? Absolutely. Rich caramel sauce? Heavenly. A simple dusting of cocoa powder? Sometimes that’s all you need.
And for my fellow “I need to prep ahead” warriors, panna cotta is the ultimate make-ahead dessert. In fact, it actually needs that overnight chill to reach its perfect texture, which means you can make it a full day before you plan to serve it. Talk about taking the pressure off at dinner time!
The History Behind Your New Favorite Dessert
Panna cotta (which literally means “cooked cream” in Italian) hails from the northern Piedmont region of Italy. While it’s become a staple on fancy restaurant menus, it’s actually a humble dessert that Italian grandmothers have been making for generations.
What I find fascinating is how this simple mixture of cream, sugar, and gelatin has stood the test of time in a world of complicated desserts. There’s something to be said for perfecting the basics, right? And trust me, once you master this recipe, you’ll understand why it’s remained a classic.
Ingredients You’ll Need
One of the best things about panna cotta is its short ingredient list. You probably have most of these items in your kitchen already:
For the Panna Cotta:
- 2 ½ cups heavy cream (the higher the fat content, the richer your dessert)
- ½ cup whole milk (helps lighten the texture a bit)
- ⅓ cup granulated sugar (or sub honey or maple syrup for a different flavor note)
- 1 ½ teaspoons unflavored gelatin powder
- 2 tablespoons cold water (for blooming the gelatin)
- 1 teaspoon pure vanilla extract (or splurge on vanilla bean paste for those gorgeous specks)
For Topping (Choose Your Adventure):
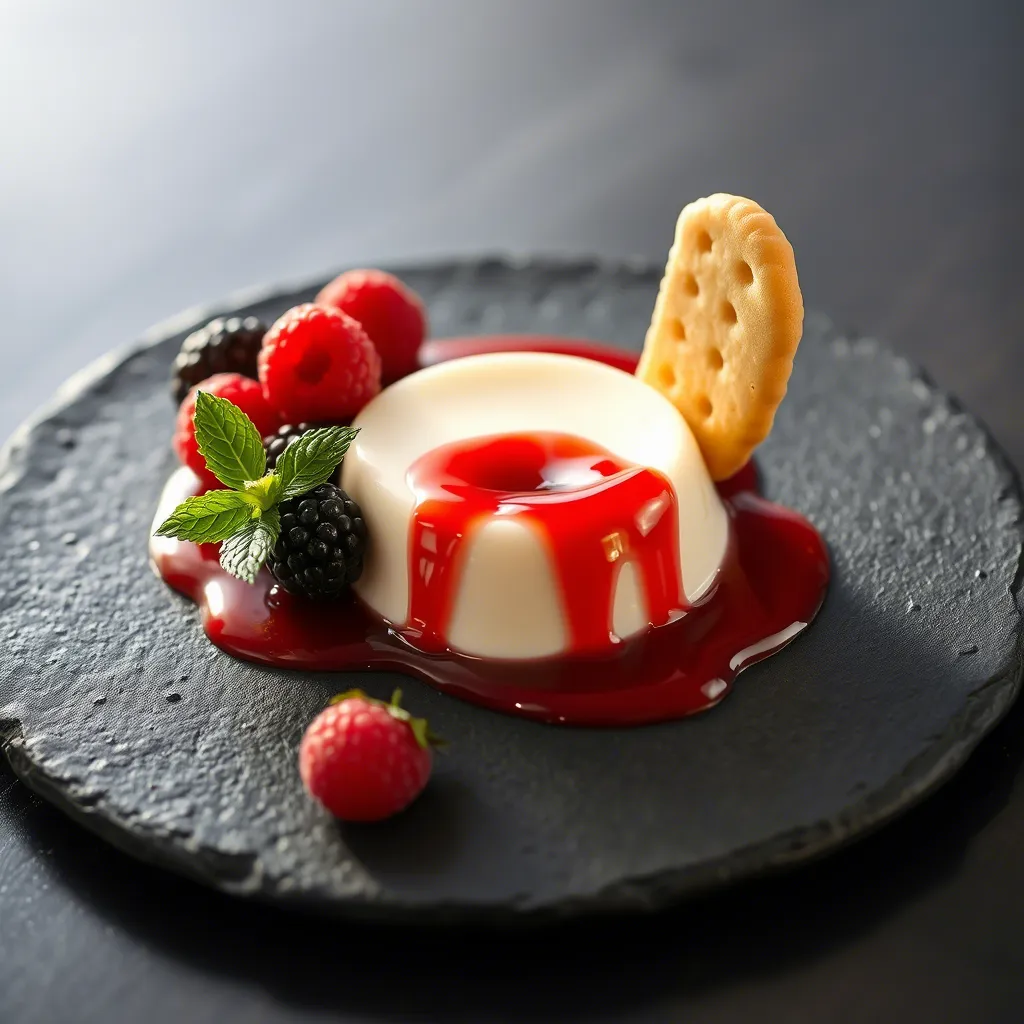
- Fresh berries (strawberries, raspberries, blueberries)
- Berry coulis or fruit syrup
- Chocolate shavings
- Caramel or honey drizzle
- Toasted nuts (almonds or pistachios add a wonderful crunch)
- Edible flowers (if you’re feeling extra fancy!)
Kitchen Tools You’ll Need
Nothing fancy required here:
- Medium saucepan
- Whisk
- Fine-mesh sieve (to catch any undissolved gelatin)
- Ramekins, glasses, or small bowls for serving
- Measuring cups and spoons
How to Make Perfect Panna Cotta Every Time
Step 1: Bloom That Gelatin
This might sound technical, but it’s super simple. Sprinkle the gelatin powder over the cold water in a small bowl and let it sit for about 5 minutes. You’ll notice it gets all spongy and weird—that’s exactly what you want! This process is called “blooming” and ensures your panna cotta will have that perfect silky-smooth texture without any unpleasant lumps.
Pro tip: If you’re going the vegetarian route with agar-agar, check the package for the right ratio—it usually differs slightly from gelatin.
Step 2: Heat the Cream Mixture
In a medium saucepan, combine your heavy cream, milk, and sugar. Warm this mixture over medium-low heat, stirring occasionally. You’re not looking to boil it—just get it hot enough to dissolve the sugar completely and warm enough to melt your bloomed gelatin.
I learned the hard way that if you let this mixture boil, you can end up with a slightly grainy texture. Keep it just below a simmer, where you see tiny bubbles forming around the edges of the pan.
Step 3: Add the Gelatin and Flavor
Once your cream mixture is warm and the sugar has dissolved, remove it from the heat and add your bloomed gelatin. Stir gently until it’s completely dissolved.
Now comes the fun part—flavor! For a classic version, add your vanilla extract or vanilla bean paste. But don’t be afraid to experiment! A bit of lemon zest, a splash of almond extract, or even a tablespoon of espresso powder can transform this dessert into something uniquely yours.
Step 4: Strain and Pour
To ensure the smoothest possible texture, strain your mixture through a fine-mesh sieve into a large measuring cup or bowl with a pour spout. This extra step catches any undissolved gelatin or bits of vanilla bean.
Now pour the mixture into your serving vessels. I like using clear glasses when I’m adding colorful toppings, but traditional ramekins work beautifully if you plan to unmold them.
Step 5: Chill, Baby, Chill
Let your panna cottas cool to room temperature first (about 30 minutes), then cover them with plastic wrap and refrigerate for at least 4 hours. For the best results, leave them overnight. The waiting is the hardest part, I know, but your patience will be rewarded with that perfect, silky set.
Serving with Style
When it’s finally time to enjoy your panna cotta, you have two presentation options. The first is the simplest—serve it directly in the vessel it was chilled in, topped with your garnish of choice. This is my go-to method for busy weeknights or when I’m not feeling particularly fancy.
The second option gives you that restaurant-quality presentation—unmolding the panna cotta onto a plate. Here’s how to do it without a disaster:
- Run a thin knife around the edge of the ramekin.
- Dip the bottom of the ramekin in warm water for about 10 seconds.
- Place a plate upside down on top of the ramekin.
- Holding the plate and ramekin together firmly, flip them over.
- Give a gentle shake, and your panna cotta should release onto the plate.
- If it doesn’t release right away, try another quick dip in warm water.
I still remember the first time I tried this at a dinner party—I held my breath the entire time! But the gasp from my guests when that perfect dome of creamy goodness appeared on the plate made it totally worth it.
Troubleshooting Tips (Because We’re All Human)
Help! My Panna Cotta Didn’t Set
Too little gelatin or not enough chilling time are usually the culprits. If your panna cotta is still too soft after overnight refrigeration, you can actually save it! Gently warm it back up, add a bit more bloomed gelatin, and rechill.
My Panna Cotta Is Too Firm
Think of it as fancy Jell-O! Just kidding (sort of). Next time, reduce the gelatin slightly. For this batch, let it sit at room temperature for about 15 minutes before serving to soften it up a bit.
There Are Lumps in My Panna Cotta
Did you skip the straining step? I’ve been there! For this batch, serve with extra toppings to distract from the texture. Next time, make sure your gelatin is fully dissolved and strain your mixture before pouring.
Make It Your Own: Flavor Variations
The classic vanilla panna cotta is just the beginning. Here are some of my favorite variations:
- Coffee Panna Cotta: Add 1 tablespoon of instant espresso powder to the cream mixture. Top with chocolate shavings and a tiny sprinkle of sea salt.
- Citrus Panna Cotta: Add the zest of one lemon or orange to the cream while heating. Remove before straining. Serve with fresh citrus segments.
- Coconut Panna Cotta: Replace half the cream with coconut milk and add a drop of coconut extract. Top with diced mango and toasted coconut flakes.
- Honey Lavender Panna Cotta: Replace the sugar with honey and add 1 teaspoon of culinary lavender to the cream (strain it out before setting). This one is surprisingly wonderful with a blueberry compote.
A Little Story About Panna Cotta Magic
Last Valentine’s Day, I completely forgot about dessert until my husband and kids were already setting the table for our special dinner. In a panic, I whipped up these panna cottas in about 15 minutes before we sat down to eat. By the time we finished our meal, they had cooled enough to go into the fridge.
The next day, I served them topped with some berries I had in the freezer (quickly thawed and mixed with a spoonful of sugar to make a simple sauce), and my 7-year-old declared me “the best dessert maker in the universe.” Little did she know it was the culinary equivalent of throwing together a last-minute school project!
That’s the magic of panna cotta—it looks like you spent hours crafting it, when really, you just need a few minutes and a little patience.
Frequently Asked Questions
Can I make panna cotta dairy-free?
Absolutely! Coconut milk makes an excellent substitute for both the cream and milk in this recipe. The flavor will be slightly different, of course, but the texture is still beautifully smooth. Almond milk works too, though the result is less rich—consider using a bit more gelatin (about ¼ teaspoon extra) to ensure it sets properly.
How long will panna cotta keep in the refrigerator?
Panna cotta can be stored covered in the refrigerator for up to 3 days, making it perfect for prepping ahead for a dinner party. The texture is actually best on day 2, after the flavors have had time to fully develop.
Can I freeze panna cotta?
While you technically can freeze panna cotta, I don’t recommend it. The texture changes significantly upon thawing, becoming grainy rather than silky. If you’ve made too many, consider it a sign from the universe that you deserve a panna cotta for breakfast!
Perfect Pairings
For a truly special dessert experience, consider what to serve alongside your panna cotta:
- A small glass of dessert wine like Moscato d’Asti complements the creamy texture beautifully
- Espresso or a rich coffee provides a bitter counterpoint to the sweet, creamy dessert
- Crisp, buttery cookies offer textural contrast (and can be used as elegant “spoons”)
Dietary Adaptations
One of the things I love most about panna cotta is how easily it can be adapted for different dietary needs:
- Lower sugar: Reduce the sugar by half or replace with a natural sweetener
- Vegetarian: Replace gelatin with agar-agar powder (usually 1 teaspoon agar powder equals 1 tablespoon gelatin)
- Lighter version: Use half-and-half instead of heavy cream
- Lactose-sensitive: Lactose-free milk products work perfectly well in this recipe
Making Memories with Panna Cotta
There’s something special about serving a homemade Italian dessert to people you love. Perhaps it’s the way panna cotta encourages you to slow down and savor each spoonful. Or maybe it’s how the simple act of making something with your hands connects you to generations of home cooks who have stirred pots of cream before you.
Whatever it is, I encourage you to use this panna cotta recipe as an opportunity to create a moment. Light a candle. Use the “good” dishes. Make an ordinary Tuesday feel special.
In our busy lives, these small rituals of sweetness matter more than we realize. And isn’t that what good food is all about? Not just nourishing our bodies, but creating little pockets of joy in our everyday lives.
The Beauty of Simplicity
In a world of over-the-top desserts competing for Instagram fame, there’s something refreshingly honest about panna cotta. It doesn’t rely on fancy decorating techniques or hard-to-find ingredients. Instead, it reminds us that when you start with quality ingredients and treat them simply, magic happens.
The next time you’re tempted to overcomplicate things in the kitchen (or in life), remember this humble Italian dessert. Sometimes, the most extraordinary pleasures come from the simplest things.
So go ahead, make this panna cotta. Make it for someone you love, or simply make it for yourself. Either way, I promise those few minutes of effort will translate into a moment of pure, creamy bliss—a small but perfect reminder that you deserve something special, even on the most ordinary of days.
I hope you fall in love with panna cotta the way I have—as both a go-to dessert and a reminder that sometimes, the simplest things are the most extraordinary.
Happy cooking! Alexandre
Learn More About Italian Desserts
If you enjoyed this panna cotta recipe, you might also like these other Italian-inspired treats on our site:
- Authentic Tiramisu Without Raw Eggs
- Easy Homemade Cannoli with Ricotta Filling
External Resources
For more about the history of traditional Italian desserts, check out Italy Magazine’s Complete Guide to Italian Desserts.
For beautiful serving ideas and plating techniques, Martha Stewart offers 10 Elegant Dessert Presentation Ideas that work wonderfully with panna cotta.


