Why You’ll Love These Vietnamese-Inspired Rice Paper Rolls
There’s something magical about Vietnamese-inspired rice paper rolls that always brings a smile to my kitchen. These translucent little bundles of joy are the answer to that age-old question: “How do I make something that’s impressive, delicious, AND doesn’t require me to spend hours sweating over a hot stove?” As a parent myself, I know the dinner struggle is real. Between soccer practice, work deadlines, and that mountain of laundry that somehow never gets any smaller, finding time to create nutritious meals can feel like trying to solve a Rubik’s cube while blindfolded.
But that’s exactly why you’ll fall head over heels for these Vietnamese-inspired rice paper rolls. They’re the culinary equivalent of finding an extra $20 in your pocket – unexpected joy that makes your day instantly better!
First off, these rolls are incredibly versatile. Think of them as the chameleons of the food world. Got leftover chicken? Throw it in. Only vegetables in the fridge? No problem! These rolls don’t judge your refrigerator situation. They’re happy to accommodate whatever ingredients you have on hand, making them perfect for those “what on earth am I going to make for dinner?” moments that strike at 5:30 PM.
The freshness factor is another reason to love these Vietnamese-inspired rolls. In a world where processed foods seem to multiply like rabbits, these rolls stand proud as beacons of wholesome goodness. Crisp vegetables, aromatic herbs, and tender proteins all wrapped in delicate rice paper – it’s like eating a garden, but in the most delicious way possible.
For the health-conscious among us (and isn’t that all of us, at least some of the time?), these rice paper rolls offer nutritional benefits without sacrificing flavor. They’re naturally gluten-free, low in calories, and can be adapted to fit practically any dietary preference. Vegan? Skip the shrimp. Low-carb? Go heavy on the veggies and protein. These rolls are the diplomatic negotiators of the food world – they know how to please everyone at the table.
Let’s talk about the entertainment factor. Setting up a rice paper roll station is basically dinner and a show combined. Lay out all the fillings, get the family involved, and suddenly Tuesday night dinner becomes an interactive experience. It’s like those fancy restaurants where they cook at your table, except nobody’s throwing shrimp at your face or making onion volcanoes. Kids especially love the hands-on aspect – there’s something deeply satisfying about rolling your own dinner, even if the results sometimes look like they were assembled by a tornado. And trust me, even the messiest rolls still taste divine.
Then there’s the peanut sauce. Oh, the peanut sauce! If these rolls are the stars of the show, the peanut sauce is the award-winning director making everything shine brighter. Creamy, slightly spicy, with that perfect balance of sweet and savory – it’s the kind of sauce that makes you consider drinking it straight from the bowl (no judgment here – we’ve all been there). I’ve actually caught guests discreetly licking their plates when they thought nobody was looking. That’s when you know you’ve hit culinary gold!
If you’re trying to incorporate more plant-based meals into your routine, these colorful beetroot falafels make another excellent option that pairs wonderfully with these rice paper rolls for a complete feast.
Another reason to love these rolls? They’re surprisingly portable. Pack them for lunch, and you’ll have coworkers eyeing your meal with undisguised envy. They’re the lunchbox equivalent of showing up to a casual dinner in a designer outfit – effortlessly impressive. Just be prepared to share the recipe because questions will follow.
The Story Behind These Vietnamese-Inspired Rice Paper Rolls
My journey with Vietnamese-inspired rice paper rolls began about seven years ago during what I affectionately call my “culinary identity crisis.” I had fallen into a rut of making the same ten dishes on rotation, and my family had developed that glazed look at dinner time – you know the one, where they’re trying to look appreciative while silently wondering if pasta could somehow be served in a new and exciting way for the fourteenth time that month.
It was during a rare solo trip to a local farmers’ market that I stumbled upon a food stall selling these beautiful, translucent rolls filled with vibrant vegetables and herbs. The vendor, an elderly Vietnamese woman named Mai, noticed my fascination and offered me a sample with a knowing smile. That first bite was like a culinary awakening – fresh, light, yet somehow deeply satisfying.
“You make these at home,” Mai told me firmly. It wasn’t a suggestion but a directive. When I confessed my intimidation, she laughed and said something I’ll never forget: “Food is not for being scared of. Food is for bringing joy.”
Those words changed something in me. The next day, armed with rice paper and a YouTube tutorial, I made my first attempt. The results were… well, let’s just say they wouldn’t have won any beauty contests. My rice papers tore, the fillings spilled out, and my first attempt at peanut sauce resembled something closer to cement than a dipping sauce. But despite their appearance, they tasted wonderful, and more importantly, my family devoured them with genuine enthusiasm.
What started as culinary experimentation quickly became a weekly tradition. “Roll Your Own Dinner Night,” my kids called it. Every Thursday, I’d prepare the fillings, and everyone would assemble their own perfect combination. My son, ever the adventurous one, would cram so many ingredients into his roll that it looked more like a burrito on steroids. My daughter took the artistic approach, carefully arranging herbs and vegetables in patterns visible through the translucent wrapper.
These rice paper rolls have accompanied us through countless family milestones. They’ve been packed for beach picnics, served at birthday celebrations, and even made an appearance at my sister’s baby shower, where several guests requested the recipe before the party was even over.
Perhaps the most memorable rice paper roll occasion was when my mother-in-law came to visit, bringing with her legendary criticism disguised as “helpful suggestions.” She watched skeptically as I set up our rice paper roll station, clearly doubtful about this departure from more traditional family meals. Two hours later, I found her in the kitchen, sleeves rolled up, making her second batch of peanut sauce and declaring that she would be introducing these to her bridge club.
Over the years, I’ve experimented with countless variations – some successful (the mango and avocado summer version was a particular hit) and others best forgotten (let’s just say that experiment with blue cheese was a one-time adventure). But the beauty of these rolls is that they evolve with you, adapting to seasons, preferences, and whatever happens to be in your refrigerator on a Thursday night.
Now, making these Vietnamese-inspired rice paper rolls is second nature to me. The rhythm of dipping the paper, waiting for that perfect pliable moment, arranging the fillings, and executing the roll with just the right amount of tension – it’s almost meditative. And when life gets particularly chaotic, there’s something soothing about the simple act of creation, of transforming individual ingredients into something greater than the sum of its parts.
Ingredients
Let’s talk about what you’ll need to create these Vietnamese-inspired rice paper rolls that will make your taste buds do a happy dance. The beauty of this recipe lies in its flexibility, but I’ll share my tried-and-true combination that never fails to impress.
First and foremost, you’ll need rice paper wrappers. These translucent circles are the magical foundation of our rolls. You can find them in most grocery stores these days, usually in the international food aisle. If your local store doesn’t carry them, any Asian market will have plenty of options. Look for ones that are about 8-9 inches in diameter – not too small (or you’ll struggle to fit your fillings) and not too large (or they’ll be unwieldy to roll). The packets usually contain many wrappers, which is perfect because, let’s be honest, there might be a few casualties during your first few attempts.
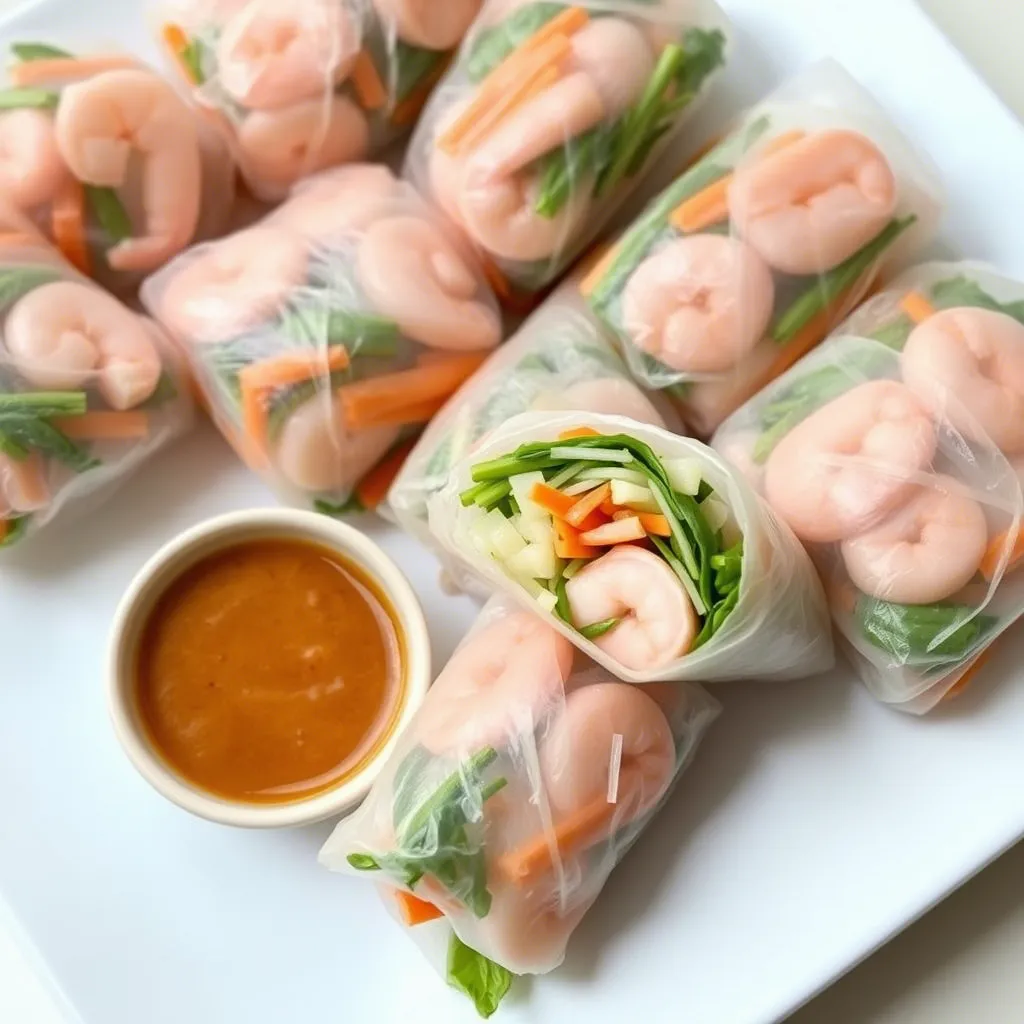
For the protein component, I like to use cooked shrimp, halved lengthwise. The pink curves look beautiful through the transparent wrapper and provide a satisfying chewiness. If shrimp isn’t your thing, thinly sliced grilled chicken, tofu, or even thinly sliced omelet work wonderfully. The key is to make sure whatever protein you choose is fully cooked and sliced thinly enough to roll easily.
Now, let’s talk vegetables – the colorful heart of our rice paper rolls. Crisp lettuce serves as a great base; I prefer butter lettuce for its tender texture and subtle sweetness, but romaine or even iceberg will work in a pinch. Carrots, julienned into matchstick-thin pieces, add a satisfying crunch and beautiful orange color. Red bell peppers, similarly julienned, contribute sweetness and a pop of vibrant red. For a refreshing bite, cucumber spears are non-negotiable in my household – peeled, seeded, and cut into thin strips.
Fresh herbs aren’t just a garnish here – they’re essential characters in our flavor story. Fresh mint leaves bring a cooling sensation that balances the other ingredients perfectly. Thai basil offers a slightly spicier, more aromatic note than regular basil, but if you can’t find it, regular basil will still be delicious. Cilantro, with its distinctive fresh flavor, might be divisive (I’m looking at you, cilantro-haters), but I find it indispensable for authentic flavor.
For an optional but highly recommended addition, thinly sliced avocado adds a creamy richness that transforms these rolls from delightful to downright decadent. Just remember to slice it last to prevent browning, and perhaps give it a little squeeze of lime juice for extra protection.
Speaking of lime, having a few wedges on hand for squeezing over the finished rolls adds a bright acidity that wakes up all the other flavors. It’s that little touch that makes people pause after their first bite and say, “Wow, what’s in these?”
Now, onto the star of the show – the peanut dipping sauce. You’ll need smooth peanut butter (natural is best, but any kind works), hoisin sauce for sweetness and depth, sriracha or chili garlic sauce for heat (adjustable to your preference), soy sauce for savory umami notes, lime juice for brightness, a touch of brown sugar to balance the flavors, and a splash of water to achieve the perfect consistency.
For garnishing your sauce, chopped roasted peanuts add a delightful textural contrast, and thinly sliced green onions bring a fresh, pungent finish. A sprinkle of sesame seeds isn’t traditional but adds a nutty dimension that complements the peanut sauce beautifully.
You’ll also need a large bowl of warm water for softening the rice paper, a clean, damp kitchen towel as your rolling surface, and a bit of patience for your first few attempts. Remember what Mai told me: “Food is not for being scared of.” Your first roll might look like it was assembled during an earthquake, but by your third or fourth, you’ll be rolling like a pro.
If you’re feeding a crowd, you might want to check out these sweet potato and black bean burritos for another versatile, customizable option that pairs well with these rolls for a diverse spread.
One final note on ingredients: while not strictly necessary, having some rice vermicelli noodles adds substance to your rolls. Prepare them according to package directions, rinse with cold water, and drain well before adding to your rolls. They bulk up the rolls nicely without overpowering the other flavors, making these suitable as a light meal rather than just an appetizer.
Execution
Now that we’ve gathered our ingredients, let’s dive into the art of rice paper roll assembly. Don’t worry – I promise it’s easier than trying to fold a fitted sheet!
Step 1: Prepare all your fillings before you even think about touching those rice papers. This is crucial! Have everything sliced, diced, chopped, and arranged in an assembly line. Trust me on this one – trying to julienne a carrot while your rice paper is rapidly drying out leads to kitchen chaos. For the shrimp, I like to butterfly them by slicing lengthwise, creating more surface area for flavor and a prettier presentation. Cook them until just pink and opaque, then chill thoroughly.
Step 2: Prepare your rolling station. Fill a large, shallow bowl with warm (not hot) water – about the temperature you’d use for a baby’s bath. The water should be warm enough to soften the rice paper but not so hot it instantly turns it to mush. Place a clean, slightly damp kitchen towel on your countertop – this will be your rolling surface. The slight dampness prevents the rice paper from sticking too firmly.
Step 3: Time for the rice paper transformation! This is where the magic happens. Take one rice paper wrapper and immerse it completely in the warm water for about 5-10 seconds. Don’t leave it soaking – it should still feel somewhat firm when you remove it. Place it flat on your damp towel. Now, watch and wait. The rice paper will continue to soften as you add your fillings. If you wait until it’s completely soft before filling, you’ll end up with a sticky, impossible-to-manage situation that might have you questioning your life choices.
Step 4: Arrange your fillings on the bottom third of the rice paper, leaving about an inch of space on each side. If using shrimp, I like to place them halved-side down about halfway up the wrapper, so they’ll show through beautifully on the finished roll. Layer lettuce first (it prevents sharper ingredients from poking through), then add your vegetables, herbs, and protein in a neat line, making sure not to overfill. Less is more here – an overstuffed roll is a torn roll.
Step 5: Now for the rolling technique! Fold the bottom edge of the rice paper up and over your filling, using your fingers to tuck the edge under the filling, creating a tight cylinder. Fold in both sides like you’re making a burrito. Then, continue rolling upward with gentle tension until you’ve got a neat package. The rice paper is self-sealing, so no need for toothpicks or other fasteners.
Step 6: If you’re new to this, your first few rolls might look like they were assembled by a toddler during a sugar rush. That’s perfectly normal and part of the learning curve! By roll number three or four, you’ll start getting the hang of it. The good news? Even the ugliest roll still tastes divine.
Step 7: As you complete each roll, place it on a plate with a bit of space between each to prevent sticking. If you need to stack them, place a piece of lightly damp paper towel between layers.
For the peanut dipping sauce, combine 1/3 cup smooth peanut butter, 2 tablespoons hoisin sauce, 1 teaspoon sriracha (more if you like heat), 1 tablespoon soy sauce, the juice of half a lime, 1 teaspoon brown sugar, and a splash of water in a bowl. Whisk until smooth, adding more water as needed to reach your desired consistency. For the best flavor development, make this sauce at least 30 minutes before serving.
A helpful hack I’ve learned from The Kitchn’s guide on homemade sauces: if your sauce seems too thick, add a teaspoon of hot water at a time. The heat helps emulsify the peanut butter better than cold water would.
If you’re preparing these for a party or aiming to impress, here’s a presentation tip: slice each finished roll diagonally in half and arrange them cut-side-up on a platter, creating a pattern where the colorful fillings are visible. Garnish the plate with additional herb leaves, lime wedges, and a small bowl of that glorious peanut sauce in the center.
For serving, you have options. These rolls can be made up to 2 hours ahead and stored at room temperature, covered with a damp paper towel and plastic wrap. For longer storage, refrigerate for up to 24 hours, but be aware they’ll firm up considerably in the fridge. Bringing them back to room temperature before serving yields the best texture.
One important note on handling: rice paper can be sticky, especially for beginners. If your fingers become tacky while rolling, dip them briefly in the bowl of water to clean them. This simple trick will save you much frustration and prevent you from inadvertently creating rice paper mittens for yourself.
Remember that rice paper is delicate but forgiving. If it tears slightly, don’t panic! Often you can simply place another wrapper on top and continue rolling. I call these “double-wrapped rolls” and pretend it was intentional all along. After all, cooking is about adaptation and problem-solving, not perfection.
The beauty of this dish lies in its interactive nature. If you’re hosting guests, consider setting up a rice paper roll station where everyone builds their own creation. Not only does this take pressure off you as the host, but it also creates a memorable, hands-on dining experience that gets everyone talking and laughing. There’s something wonderfully communal about gathering around a table filled with colorful ingredients, sharing techniques, and comparing results.
Additional Tips
Now that you’ve mastered the basics of Vietnamese-inspired rice paper rolls, let’s elevate your roll game with some pro tips, variations, and troubleshooting advice that I’ve gathered through years of rice paper adventures (and misadventures).
Let’s start with rice paper selection. Not all rice papers are created equal! If possible, look for those made in Vietnam with just rice, water, and salt in the ingredients list. Some varieties include tapioca starch which makes them slightly thicker and more forgiving for beginners, but purists prefer the thinner, all-rice versions for their delicate texture. The brands Three Ladies or Rose are reliable choices that I’ve found consistently perform well.
Temperature matters tremendously when working with rice paper. On hot summer days, you’ll need cooler water as the rice paper softens more quickly. Conversely, in winter, slightly warmer water works better. It’s a bit like Goldilocks – you’re looking for that “just right” temperature that gives you enough time to work before the paper becomes too sticky.
For make-ahead situations, here’s a game-changing tip: prepare all fillings and your dipping sauce in advance, but don’t assemble the rolls until within two hours of serving. If you absolutely must prepare them further ahead, wrap each roll individually in plastic wrap to prevent them from drying out or sticking together. However, be warned that the texture is never quite as perfect as freshly made.
Speaking of texture, let’s talk about preventing the dreaded “tough rice paper syndrome.” If your rolls feel rubbery rather than tender, you’re likely soaking the paper too long. A quick dip – literally seconds – is all that’s needed. The paper should still feel slightly firm when you remove it from the water. It continues to soften as you add fillings.
For a stunning presentation that will make your social media followers drool, try layering colorful ingredients directly on the rice paper where they’ll show through. Edible flowers like pansies or marigold petals, bright red chili slices, or purple shiso leaves create an Instagram-worthy effect with minimal effort.
Experimenting with variations is half the fun of making these rolls! For a breakfast twist, try filling them with scrambled eggs, avocado, and spinach with a sriracha dipping sauce. For a dessert version (yes, really!), fill with thinly sliced mango, banana, a sprinkle of coconut, and a light honey-yogurt dipping sauce. My kids go crazy for the dessert version – it’s like a healthier crepe that they can help create.
If you find yourself with leftover filling ingredients, don’t let them languish in the refrigerator! Throw everything into a bowl, drizzle with some of that peanut sauce, add a splash of lime juice, and you’ve got yourself a delicious “deconstructed rice paper roll” salad for lunch the next day. Food waste averted and another tasty meal sorted!
Storage solutions are worth mentioning because these rolls can be a bit high-maintenance after they’re made. If you need to refrigerate them, place them in a container lined with damp paper towels, not touching each other if possible, and cover with another damp paper towel before sealing the container. This maintains humidity and prevents the wrappers from drying out and hardening.
For the peanut sauce, if you find it thickens too much upon standing, simply whisk in a tablespoon of hot water at a time until it reaches your desired consistency. The sauce actually improves with time as the flavors meld, so making it a day ahead is perfectly fine. Store it in an airtight container in the refrigerator for up to a week – it’s also delicious drizzled over steamed vegetables or as a quick salad dressing.
If you’re serving these at a gathering, consider creating a “sauce flight” with the peanut sauce as the star, but accompanied by other options like sweet chili sauce, nuoc cham (Vietnamese dipping sauce with fish sauce, lime, and sugar), or even a miso-ginger sauce. Different guests prefer different levels of spice and sweetness, and offering options guarantees everyone finds their perfect pairing.
For those with peanut allergies in the family, a sunflower seed butter substitution works surprisingly well in the sauce. Simply replace the peanut butter with an equal amount of sunflower seed butter, and you may need to add a touch more sweetener as sunflower butter tends to be slightly more bitter than peanut butter.
Looking to incorporate these rolls into a larger Asian-inspired feast? Consider pairing them with these delicious sesame ginger noodles for a complete and satisfying meal.
Temperature control extends to your fillings as well. Make sure all ingredients are at room temperature or cooler before assembly. Hot fillings create condensation inside the roll, which can lead to tearing. This is particularly important with proteins like shrimp or chicken – make sure they’re fully cooled before rolling.
For a fun family activity that doubles as dinner preparation, assign different filling prep tasks to different family members. Even young kids can help tear lettuce leaves or pluck herb leaves from stems. Cooking becomes a communal activity rather than a chore, and in my experience, kids are much more likely to try foods they’ve helped prepare.
A crucial tip for beginners: don’t be discouraged if your first few attempts look less than perfect! Rice paper rolling has a learning curve, but the beauty of this dish is that even the messiest rolls still taste wonderful. Focus on keeping your fillings fresh and your sauce flavorful, and the aesthetics will improve with practice.
FAQs
Can I make Vietnamese-inspired rice paper rolls ahead of time?
You can prepare rice paper rolls up to 2 hours before serving, stored at room temperature under a damp cloth and plastic wrap. For longer storage, individually wrap each roll in plastic and refrigerate for up to 24 hours. However, the texture is best when fresh, as refrigeration tends to harden the rice paper. If you must make them ahead, I recommend preparing all fillings and assembling just before serving for optimal results.
What’s the best way to prevent rice paper rolls from sticking together?
To prevent your beautifully crafted Vietnamese-inspired rice paper rolls from forming an inseparable bond, make sure each roll is placed on a surface with enough space between them. A lightly damp cloth or paper towel works well as a base. If you need to stack them, place a sheet of damp paper towel between layers. For storage, individually wrapping each roll in plastic wrap is the most effective method, though less environmentally friendly. Alternatively, a bamboo sushi rolling mat provides excellent separation.
How do I fix a torn rice paper wrapper?
Don’t panic if your rice paper tears during rolling – it happens to the best of us! For small tears, simply continue rolling as the moisture often allows the wrapper to self-seal. For larger tears, you have two options: either place another wrapper on top and continue (creating a double-wrapped roll that’s actually more durable), or start fresh with a new wrapper. Remember, torn wrappers don’t affect the taste, only the appearance, so if you’re not concerned about presentation, carry on rolling!
Can I use something other than rice paper for these rolls?
While traditional Vietnamese spring rolls use rice paper, you can experiment with alternatives if you’re in a pinch. Lettuce leaves (particularly butter lettuce) create fresh wraps with a satisfying crunch. Rice wrappers, however, provide that distinctive chewy texture and translucent appearance that makes these rolls visually stunning. According to Serious Eats’ guide to Asian wrappers, rice paper offers the best combination of pliability and flavor for fresh rolls.
What if I don’t like cilantro? Can I substitute another herb?
Absolutely! Cilantro can be polarizing – some people love it, while others think it tastes like soap (there’s actually a genetic component to this preference). Excellent substitutions include additional mint, Thai basil, regular basil, or even flat-leaf parsley. Some people enjoy shiso leaves (perilla), which offer a unique minty-basil flavor with hints of anise and citrus. The key is using fresh herbs that complement the other ingredients, so feel free to experiment with your favorite combinations.
How do I adjust the peanut sauce if it’s too thick or too thin?
Finding the perfect consistency for your Vietnamese-inspired rice paper rolls’ peanut sauce is simple with a few adjustments. If your sauce is too thick, add warm water one tablespoon at a time, whisking thoroughly between additions until you reach your desired consistency. For a sauce that’s too thin, add more peanut butter one teaspoon at a time. If you’ve added too much water and diluted the flavor, a small amount of additional hoisin sauce, soy sauce, and lime juice will restore balance while maintaining the thinner consistency.
Can I make these rolls vegan or vegetarian?
These Vietnamese-inspired rice paper rolls are extremely adaptable for different dietary needs. For vegetarian rolls, simply omit the shrimp and add extra vegetables or tofu. For vegan versions, ensure your hoisin sauce is vegan (most commercial brands are) and consider adding protein-rich options like fried tofu, tempeh, or edamame. Avocado adds wonderful creaminess that complements plant-based fillings beautifully. A colorful array of vegetables like purple cabbage, yellow bell peppers, and orange carrots creates visually stunning vegan rolls that don’t sacrifice satisfaction.
Whatever your skill level or dietary preferences, Vietnamese-inspired rice paper rolls offer endless possibilities for customization. The key to success is fresh ingredients, a relaxed approach, and willingness to embrace imperfection as part of the learning process. Each roll you make will be better than the last, and before long, you’ll be rolling with confidence and creativity.
Remember that these fresh spring rolls aren’t just a meal—they’re an experience. The tactile process of rolling, the vibrant appearance, and the bright flavors create a multisensory delight that elevates everyday dining into something special. In our busy world of convenience foods and rushed meals, taking the time to prepare something by hand—something that requires presence and care—becomes almost meditative. So gather your ingredients, invite some friends or family to join, and discover why Vietnamese-inspired rice paper rolls have earned a permanent place in my recipe collection and my heart.
With their fresh flavors, adaptable ingredients, and that irresistible peanut sauce, these Vietnamese-inspired rice paper rolls are sure to become a regular feature in your culinary repertoire. Happy rolling!


