Why You’ll Love These Spring Vegetable Grain Bowls
Oh, hello there! It’s Alexandre here, and I can already feel the gentle spring breeze floating through my kitchen windows as I put together these vibrant spring grain bowls. When the first farmers markets start displaying those tender green vegetables, I know it’s time to lighten things up after months of hearty winter stews and casseroles.
These spring vegetable grain bowls with lemon vinaigrette are like sunshine in a bowl – bright, nourishing, and exactly what your body craves as the seasons shift. If you’ve been in a lunch rut (we’ve all been there!), this recipe is your ticket out. The combination of chewy grains, crisp spring vegetables, and that zingy lemon dressing will have you looking forward to your midday meal again.
As a busy parent myself, I understand the challenge of putting something nutritious on the table when life is pulling you in twelve different directions. That’s why I adore these grain bowls – they’re extremely flexible and forgiving. Running late for work? Pack the components separately and assemble at lunchtime. Got picky eaters at home? Let everyone customize their own bowl with their favorite spring vegetables.
What makes these bowls special is the perfect balance of flavors and textures. The nutty grains provide a hearty base, the spring vegetables add freshness and color, while the lemon vinaigrette ties everything together with its bright acidity. It’s a symphony of flavors that feels sophisticated yet requires minimal effort.
For my fellow meal-preppers out there (high five!), these bowls are your new best friend. Make a big batch of grains on Sunday, chop your vegetables, mix up the dressing, and you’ve got lunches sorted for days. Talk about working smarter, not harder!
What I particularly love about this spring grain bowl recipe is how it celebrates seasonal eating. There’s something magical about cooking with vegetables at their peak – they’re more flavorful, more nutritious, and frankly, more affordable. It’s a win-win-win situation!
And let’s talk about that moment when you take your first bite – the tender-crisp asparagus, the sweet pop of fresh peas, the satisfying chew of perfectly cooked farro or quinoa, all brought together by that lemony dressing that makes your taste buds do a little happy dance. It’s the kind of meal that makes you feel good while eating it AND afterward – no heavy, sluggish feeling here!
For my friends with busy schedules (which is pretty much all of us these days), these bowls pack well for office lunches, picnics, or even as a light dinner after a hectic day. They’re substantial enough to keep you satisfied but won’t send you into that dreaded afternoon energy slump that has you reaching for another coffee at 3 PM.
So whether you’re looking to incorporate more plant-based meals into your routine, searching for make-ahead lunch options that actually taste good on day three, or simply wanting to celebrate spring’s bounty, these grain bowls have got your back. Trust me, they might just become your new springtime signature dish!
The Story Behind These Spring Vegetable Grain Bowls
My journey with these spring grain bowls began on a particularly chaotic Tuesday afternoon. Picture this: I had just picked up my youngest from soccer practice, had a deadline looming for a new recipe collection, and couldn’t face another evening of takeout. As I frantically searched my kitchen for inspiration, I spotted some forgotten farro in my pantry and some slightly sad-looking spring vegetables in the crisper drawer.
“Well,” I thought, “it’s either make something with these or watch them all go to waste.” And let me tell you, my frugal grandmother would rise from her grave to scold me if I tossed perfectly good food!
What started as a desperate kitchen-sink meal turned into something my family now requests weekly during spring. My son, who typically regards green vegetables with the same enthusiasm as a trip to the dentist, actually asked for seconds! I nearly fell off my chair in shock.
There’s something about the combination of tender-crisp vegetables, hearty grains, and that bright lemon dressing that transforms simple ingredients into something truly special. It reminds me of my time studying cooking in southern France, where local, seasonal ingredients were treated with such respect. The farmers there taught me that the fresher the produce, the less you need to fuss with it.
I remember one elderly farmer at the market in Nice who would look offended if you even suggested cooking his spring peas for more than 60 seconds. “You’ll kill them!” he’d exclaim in his melodic accent. And you know what? He was absolutely right. Those sweet peas needed nothing more than a quick blanch to showcase their natural perfection.
These grain bowls have become something of a tradition in our house now. When the first asparagus appears at our local farmers’ market, my kids know it’s officially “grain bowl season.” We make an event of it – everyone gets to customize their own bowl with their favorite spring vegetables and toppings. My daughter always goes heavy on the radishes (that girl loves anything with a bit of a kick!), while my son creates what he calls “strategic piles” to keep different elements from touching. Kids, am I right?
Last spring, I brought these bowls to a neighborhood potluck, and my normally recipe-guarding neighbor Martha practically cornered me in the kitchen demanding to know what was in the dressing. “It’s just lemon juice, olive oil, and a touch of honey,” I told her. She looked so disappointed that there wasn’t some secret ingredient that I almost felt bad! Sometimes the simplest combinations are truly the most magical.
What I love about sharing this recipe with you is knowing that it might become part of your family’s traditions too. Maybe you’ll make it for a lazy weekend lunch on the patio, or pack it for your first springtime picnic. Perhaps it’ll be your reliable “I have nothing planned for dinner” backup, just like it was for me on that fateful Tuesday.
Cooking isn’t just about feeding our bodies; it’s about creating memories, establishing traditions, and showing love. These grain bowls might seem simple, but they carry all of that potential within them. So as you chop those spring vegetables and whisk that lemon dressing, know that you’re not just making lunch – you’re creating a moment that might just become a cherished memory.
Ingredients
I believe that great cooking starts with great ingredients, especially when we’re talking about something as simple and fresh as these spring grain bowls. When spring vegetables are at their peak, they need very little to shine – just a good grain base and a bright dressing to tie everything together.
For the grain base, you have plenty of options depending on what you’re craving or what’s already hanging out in your pantry. My personal favorite is farro, with its delightfully chewy texture and nutty flavor that pairs so beautifully with spring vegetables. But quinoa works wonderfully if you need a gluten-free option (and adds a protein boost for my vegetarian friends!). Barley, brown rice, or even a rice blend all make excellent foundations for these bowls.
Don’t feel like you need to run to the store for a specialty grain – the beauty of these bowls is their flexibility. That half cup of leftover rice from last night’s dinner? Perfect! A forgotten bag of quinoa in the back of your cupboard? Bring it on! If you’re anything like me, finding a delicious way to use up what you already have feels like a small victory in the battle against food waste.
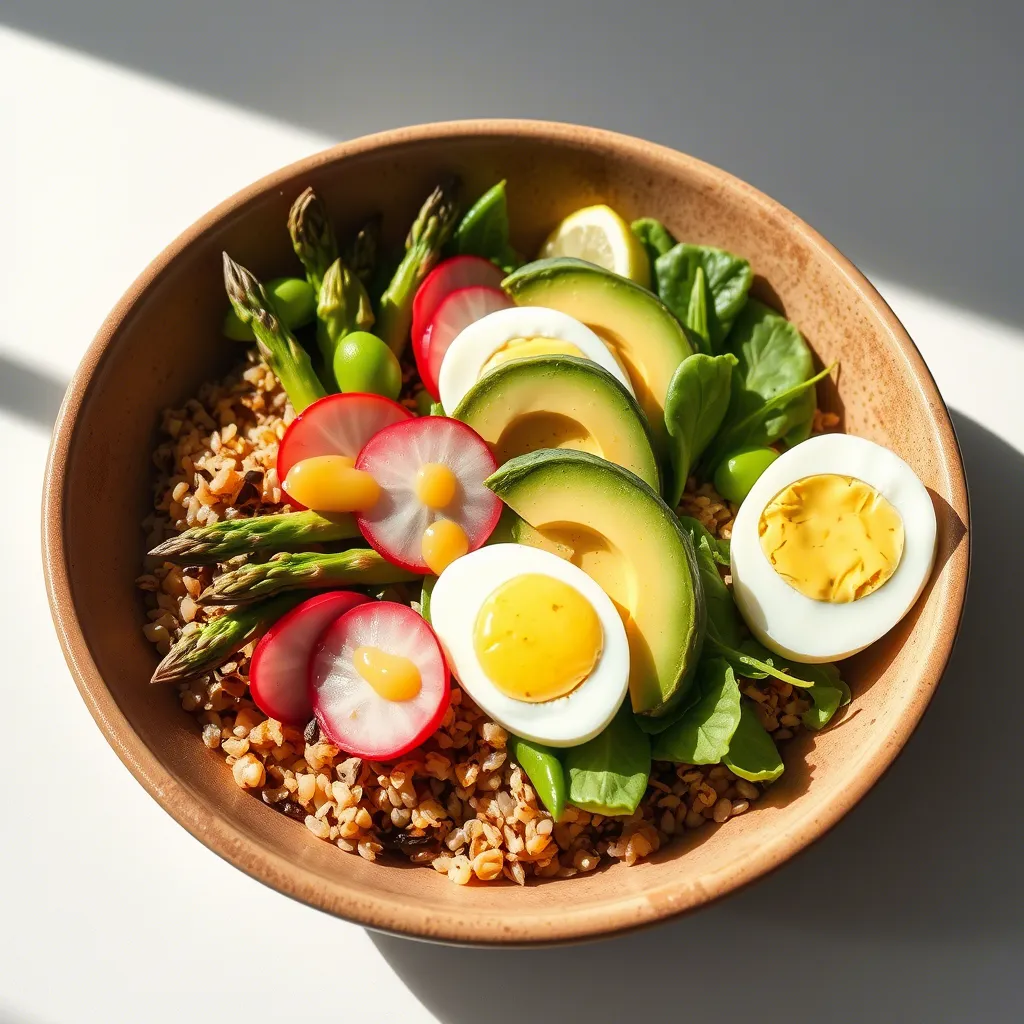
Now, let’s talk about the star players – those gorgeous spring vegetables. The farmers markets are bursting with options this time of year, but some of my must-haves include:
Asparagus (1 bunch): Look for spears with tight, compact tips and stems that aren’t too woody. Thin or thick – both work beautifully, though thicker spears may need an extra minute of cooking time. Asparagus is the ultimate spring vegetable, with a grassy, fresh flavor that simply tastes like the season.
Fresh or frozen peas (1 cup): Sweet little green jewels that add a pop of color and flavor. Fresh peas are a spring treat, but don’t hesitate to use frozen in a pinch – they’re usually picked and frozen at peak freshness and will save you the shelling time!
Radishes (1 bunch): These peppery, crunchy discs add such a beautiful color contrast and textural element. I love using watermelon radishes when I can find them for their stunning pink interiors, but regular red radishes are equally delicious.
Spring onions or scallions (1 bunch): Milder and more delicate than their storage-onion cousins, these add a gentle allium flavor that won’t overpower the other spring vegetables.
Tender greens (2 cups): Baby spinach, arugula, or spring mix all work beautifully as a base layer in the bowl. They wilt slightly under the warm grains, creating a lovely middle ground between raw and cooked.
Fresh herbs (1/2 cup, loosely packed): Don’t skip these! Fresh dill, mint, chives, or parsley add brightness and fragrance that takes these bowls to the next level.
For protein additions (optional but recommended for a more substantial meal):
Soft-boiled eggs (1 per bowl): That jammy yolk creates an almost secondary dressing when it breaks over the vegetables. Divine!
Crumbled feta or goat cheese (1/4 cup): A little tangy cheese adds richness and complements the lemon dressing perfectly.
Cooked chicken or salmon (4 oz per bowl): Leftover roasted chicken or a simple piece of salmon makes these bowls hearty enough for dinner.
Chickpeas or white beans (1 cup): For my plant-based friends, these add protein and fiber to keep you satisfied.
Now, for that magical lemon vinaigrette that ties everything together:
Fresh lemon juice (1/4 cup): Please use fresh! Those bottled versions simply can’t compare to the bright, aromatic juice of freshly squeezed lemons.
Extra virgin olive oil (1/3 cup): Use the good stuff here – with minimal ingredients, quality really matters.
Honey or maple syrup (1 teaspoon): Just a touch to balance the acidity of the lemon.
Dijon mustard (1 teaspoon): This acts as an emulsifier to help your dressing stay mixed and adds a subtle depth.
Garlic (1 small clove): Finely minced or pressed, it adds a gentle bite that works wonders with the lemon.
Salt and freshly ground black pepper (to taste): Seasoning is personal, so adjust according to your preference.
Optional but wonderful additions: A pinch of red pepper flakes for heat, a teaspoon of fresh lemon zest for extra citrus punch, or a teaspoon of fresh thyme leaves.
What makes these ingredients special is how they come together to create something greater than the sum of their parts. The nutty grains, the sweet spring vegetables, the bright dressing – it’s a harmony of flavors and textures that celebrates the essence of the season.
Execution
Now comes the fun part – bringing all these beautiful spring ingredients together into a bowl that’s as delightful to look at as it is to eat. Don’t worry, we’re keeping things simple here!
Step 1: Cook your grain of choice Start by cooking your chosen grain according to the package instructions. As a general rule:
- For farro or barley: Rinse 1 cup grain, then simmer in 3 cups water or broth for about 25-30 minutes until tender but still chewy.
- For quinoa: Rinse 1 cup thoroughly (this removes the bitter coating), then simmer in 2 cups water for about 15 minutes until the little tails pop out.
- For rice: Use a 1:2 ratio of rice to water and cook according to your preferred method.
While your grain cooks, season the cooking water with a good pinch of salt – this is your chance to build flavor from the ground up! I also like to add a bay leaf or a small sprig of thyme for an extra layer of subtle flavor.
Once cooked, drain any excess liquid if necessary, then spread the grain on a baking sheet to cool slightly while you prepare the vegetables. This prevents it from continuing to steam and becoming mushy. Nobody wants a mushy grain bowl!
Step 2: Prep your spring vegetables While the grain is cooking, let’s get those vibrant spring vegetables ready. The key here is to maintain their fresh, crisp texture while bringing out their natural sweetness.
For the asparagus:
- Snap off the woody ends (they’ll break naturally at the right point when you bend them).
- Cut the spears into 2-inch pieces.
- Blanch in boiling salted water for just 2-3 minutes until bright green and tender-crisp.
- Immediately transfer to an ice bath to stop the cooking and preserve that gorgeous green color.
For fresh peas: If using fresh peas from the pod, blanch them for just 1-2 minutes in boiling water, then shock in ice water. If using frozen peas, you can simply run them under warm water to thaw – they’re already blanched before freezing!
For radishes: Trim the tops and ends, then slice thinly. I love using a mandoline for this to get paper-thin, almost translucent slices, but a sharp knife works perfectly well too.
For spring onions or scallions: Trim the root ends and any wilted parts of the green tops, then slice thinly on a diagonal for a more elegant presentation.
For tender greens: Give them a good wash and dry thoroughly. Nothing ruins a beautiful grain bowl faster than gritty greens!
For fresh herbs: Pick the leaves from the stems (if necessary) and roughly chop or tear just before assembling to preserve their fragrance and prevent browning.
Step 3: Make the lemon vinaigrette In a small jar or bowl:
- Combine the fresh lemon juice, minced garlic, Dijon mustard, honey or maple syrup, salt, and pepper.
- Slowly whisk in the olive oil until emulsified. If using a jar, simply seal and shake vigorously.
- Taste and adjust seasoning – it should be bright and tangy but not overwhelmingly sour.
This dressing can be made up to 3 days ahead and stored in the refrigerator. Just bring it to room temperature and give it a good shake or whisk before using, as the olive oil will naturally solidify when chilled.
Step 4: Prepare your protein (if using) For soft-boiled eggs:
- Bring a small pot of water to a gentle boil.
- Carefully lower room-temperature eggs into the water with a slotted spoon.
- Set a timer for exactly 6 minutes and 30 seconds for that perfect jammy yolk.
- Transfer to an ice bath, then peel when cool enough to handle.
For chickpeas or white beans: If using canned, simply drain, rinse well, and pat dry. For extra flavor, you can toss them with a bit of olive oil, salt, and a sprinkle of cumin or smoked paprika.
For leftover chicken or salmon: Gently warm it to take the refrigerator chill off, or use at room temperature – cold protein can dull the flavors of the other ingredients.
Step 5: Assemble your spring grain bowls Here’s where you get to channel your inner artist! The assembly process is less about strict rules and more about creating a beautiful presentation:
- Start with a base of tender greens in each bowl.
- Add a generous scoop of your cooked grain.
- Arrange your prepared spring vegetables in neat sections around the bowl – this makes for a more attractive presentation than mixing everything together.
- Add your protein of choice.
- Drizzle everything with the lemon vinaigrette – be generous, as the grains will absorb some of the dressing.
- Finish with a scattering of fresh herbs and an extra grind of black pepper.
For a beautiful final touch, I love adding a sprinkle of flaky sea salt and a wedge of lemon on the side. It’s these little details that elevate a simple meal to something that feels special.
The beauty of these spring grain bowls is that they’re just as delicious served slightly warm as they are at room temperature, making them perfect for busy weeknight dinners when family members might be eating at different times. The flavors actually continue to develop as the ingredients sit together, which is why these make such excellent meal-prep options.
Remember, cooking should be joyful, not stressful! If you don’t have all the exact vegetables listed, use what you have. The soul of this recipe is about celebrating spring’s bounty, not following a rigid formula.
Additional Tips
If there’s one thing I’ve learned from years of cooking (and, let’s be honest, from years of making mistakes in the kitchen), it’s that a few insider tips can make the difference between a good meal and a great one. So let me share some of my favorite tricks to take these spring grain bowls from delicious to absolutely sublime!
Grain Perfection
The foundation of any great grain bowl is, of course, perfectly cooked grains. For farro, barley, and other hearty grains, try this restaurant trick: toast them dry in your pot for 1-2 minutes before adding the cooking liquid. This simple step develops a nutty flavor that adds incredible depth to your finished dish.
Another game-changer? Cook your grains in vegetable or chicken broth instead of water. Those grains are like little flavor sponges, and they’ll soak up whatever you cook them in. Even better, try adding a parmesan rind to the cooking liquid – it infuses the grains with an umami richness that’s absolutely divine.
Don’t be afraid to cook your grains ahead of time! They actually keep wonderfully in the refrigerator for up to 5 days, making weeknight meal assembly lightning-fast. Just store them in an airtight container with a small piece of paper towel on top to absorb excess moisture.
Vegetable Brilliance
The secret to those vibrant, perfectly cooked spring vegetables? It’s all about the ice bath. After blanching, plunging your green vegetables into ice water not only stops the cooking process but also sets that gorgeous emerald color. No more sad, dull green veggies on your watch!
For radishes that pack an extra punch of flavor, try quick-pickling them. Just combine equal parts white vinegar and water with a pinch of sugar and salt, then let the sliced radishes soak for at least 15 minutes. They’ll turn a beautiful pink and develop a sweet-tangy flavor that cuts through the richness of the rest of the bowl.
When it comes to asparagus, size matters – but not in the way most people think! While those pencil-thin spears might look more elegant, the thicker ones often have better flavor. Just be sure to peel the lower half of thick spears with a vegetable peeler to remove any tough outer layer.
Dressing Brilliance
Want to take your lemon vinaigrette to the next level? Try infusing your olive oil with herbs ahead of time. Simply warm the oil with a sprig of thyme or rosemary, then cool and strain before using. This subtle infusion adds an aromatic quality that transforms a simple dressing into something truly special.
For a creamier dressing variation, add a tablespoon of Greek yogurt to your lemon vinaigrette. It creates a luscious texture that clings beautifully to the grains and vegetables, and the subtle tanginess complements the spring vegetables perfectly.
The dressing can be made up to a week ahead and stored in a jar in the refrigerator – just remember to take it out about 30 minutes before using, as the olive oil will solidify when cold. A quick shake or whisk will bring it back to life!
Make-Ahead Magic
These spring grain bowls are perfect for meal prep, but a little strategic planning makes all the difference. Store the components separately, with the dressing in its own container and any delicate greens wrapped in a slightly damp paper towel. This prevents everything from getting soggy before you’re ready to eat.
If you’re taking these bowls to work, try layering the ingredients in a mason jar with the dressing on the bottom, followed by the heartier vegetables, grains, and finally the greens on top. When you’re ready to eat, just shake it up, and voilà – a perfectly dressed bowl with minimal effort!
Seasonal Adaptations
While this recipe celebrates spring, the basic formula can be adapted for any season. In summer, try cherry tomatoes, grilled zucchini, and fresh corn. Fall calls for roasted butternut squash, Brussels sprouts, and dried cranberries. Winter can feature roasted root vegetables, hearty kale, and pomegranate seeds. It’s like having four recipes in one!
Storage Smarts
If you have leftover assembled bowls, they’ll keep in the refrigerator for up to 2 days. Just be aware that the greens will wilt a bit – not necessarily a bad thing, but something to consider.
For longer storage, keep components separate. Cooked grains will last 5-7 days refrigerated, blanched vegetables 3-4 days, and the dressing up to a week. This modular approach gives you the flexibility to mix and match throughout the week.
Texture Boosters
Want to add some crunch? Toast some pepitas, sunflower seeds, or slivered almonds until golden and fragrant, then sprinkle them over your bowl just before serving. That textural contrast takes these bowls to a whole new level of deliciousness.
For a fun twist that my kids absolutely love, try adding some homemade croutons. Cut day-old bread into cubes, toss with olive oil, salt, and herbs, then bake until crispy. They add a wonderful textural element and help use up bread that might otherwise go to waste – my grandmother would definitely approve!
Presentation Pointers
We eat with our eyes first, so a little attention to presentation goes a long way. Try using a ring mold to neatly stack your grains, then arrange the vegetables around them for a restaurant-worthy presentation.
Another easy trick? Serve the bowls on a bed of extra greens for a more abundant look, or garnish with edible flowers like chive blossoms or nasturtiums for a truly Instagram-worthy meal.
Remember, cooking should bring joy, not stress. These tips are meant to inspire, not intimidate. Use what works for you and your lifestyle, and know that even the simplest version of these spring grain bowls will be delicious. The most important ingredient, as always, is the love you put into preparing food for yourself and those you care about.
FAQs
Q: Can I make these spring grain bowls completely ahead of time?
A: Absolutely! These bowls are perfect for meal prep. For best results, store the components separately and assemble just before eating. The grains can be cooked up to 5 days ahead, vegetables prepped 2-3 days ahead, and the dressing made up to a week in advance. If you do assemble the full bowls ahead, they’ll keep well for about 2 days in the refrigerator, though the greens may wilt a bit.
Q: I’m gluten-free. What grains would you recommend for these spring vegetable bowls?
A: Quinoa is my top recommendation for a gluten-free option – it’s not only safe for those with gluten sensitivities but also adds a protein boost! Other excellent gluten-free alternatives include brown rice, wild rice, or millet. Just be sure to check packaging to ensure they’re certified gluten-free if you have celiac disease, as cross-contamination can occur during processing.
Q: How can I make these grain bowls more filling for a heartier dinner option?
A: Great question! For a more substantial meal, I recommend doubling the protein component. Add a full soft-boiled egg per person plus either chickpeas or grilled chicken. You can also increase the grain portion to 3/4 cup per bowl and add some healthy fats like avocado slices or a generous sprinkle of toasted nuts. These additions will make the spring grain bowl more satisfying while maintaining its fresh, seasonal character.
Q: My kids aren’t big vegetable fans. Any tips for making these more kid-friendly?
A: As a parent, I completely understand this challenge! Try setting up a “bowl bar” where kids can choose their own components – having control over what goes in their bowl often increases their willingness to try new things. You can also roast the vegetables instead of blanching them, as roasting brings out natural sweetness. Another trick is to chop vegetables smaller or even grate them so they blend into the grains more. And don’t underestimate the power of a good dressing – many kids who “hate vegetables” will suddenly love them when they’re coated in a honey-sweetened lemon dressing!
Q: Can I use frozen vegetables for this recipe when fresh spring produce isn’t available?
A: Yes, you definitely can! Frozen peas and green beans work particularly well. Thaw them under cool running water and add them to the bowl without cooking (they’re already blanched before freezing). For asparagus, frozen isn’t ideal texture-wise, but you can substitute frozen broccoli florets, blanched for just 2 minutes. The beauty of this recipe is its flexibility – use what you have available and what fits your budget.
Q: How long does the lemon vinaigrette stay fresh?
A: The lemon vinaigrette will keep beautifully in an airtight container in the refrigerator for up to 7 days. The olive oil may solidify when cold, so just bring it to room temperature and give it a good shake or whisk before using. If you find the lemon flavor has diminished after storage, a quick squeeze of fresh lemon will brighten it right back up!
Q: I don’t have all the spring vegetables listed. Can I substitute with what I have on hand?
A: That’s the beauty of these grain bowls – they’re incredibly adaptable! Use whatever vegetables you have available or look best at your market. Sugar snap peas, snow peas, baby carrots, cucumber, fennel, or even lightly blanched broccoli all work wonderfully in spring versions. The key is having a mix of textures and colors. Let what looks fresh and vibrant at the market guide your choices – that’s how the best cooking happens!
Spring is a time of renewal and fresh beginnings, and these grain bowls capture that spirit perfectly. The combination of nutty grains, vibrant spring vegetables, and bright lemon dressing creates a harmonious balance that nourishes both body and soul. As the seasons shift and tender green shoots push through the soil, there’s something deeply satisfying about bringing that same fresh energy to our tables.
What I love most about this spring grain bowl recipe is its versatility. It’s elegant enough for a weekend lunch with friends yet simple enough for a quick weeknight dinner. It works as a complete meal on its own or as a side dish alongside grilled fish or chicken. And while it celebrates the unique bounty of spring, the basic formula can be adapted year-round, making it a recipe you’ll return to again and again.
So as the world outside bursts into bloom, bring some of that springtime magic into your kitchen with these vibrant, nourishing grain bowls. Your body will thank you for the nutrients, your taste buds will delight in the flavors, and that little spark of joy that comes from eating something truly delicious? Well, that’s just the cherry on top.
Until next time, happy cooking!
Alexandre


